Friday, March 26, 2010

Tutorial ~Fabric Flower~


Just as I promised, I am going to show you how I made some flowers from the top portion of the dress. The top part had lining (it was also gauze) that is a very pretty light blue. When I separated them, I thought to myself, "I have to use this too! :)"

{You will need}

Light weight fabric
Matching Thread

{How to}

1. I cut out 8- 2 1/2" squares from each color.


2. Fold a square in half, then fold it again to make a smaller square.


3. Cut the outer edges(not the folded edges). It will almost look like a heart shape.


When you open it up... it will look like this. Repeat the process for the rest of the squares.


4. Pinch in the middle and stitch 2-3 times. Keep adding the rest of the pieces to it.


5. Then you will have a flower like these...


For the floral print flower, after you fold the squares into fourths, cut opposite corners to make it look like a leaf. When you unfold it, it will look like a four leaf clover with pointed leaves. (Sorry, I didn't take a picture of that.)

I loved the frayed look. I am very curious about using different types of fabric; I wonder how the flowers will turn out. I haven't decided what I am going to do with them, but I have a weekend to think about it.

Meanwhile I made this too... all I can say is you can never have too many flowers.

better after

a big thank you to lindsey from the blog better after for featuring charm home on her blog.  she posted pictures of a changing table transformation from a nursery that i’ve been working on for a good friend and client of mine. 

THANKS LINDS!!!

you can see her post here.

updates 007

LiveJournal Tags: ,,


loving…

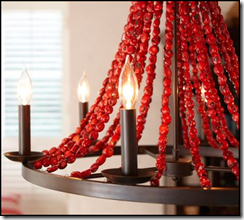
1.  this lafayette chandelier from pottery barn.  simply beautiful.

image image

2.  this “kitchen love” post from paloma at la dolce vita.  so many great kitchen pics in one spot.

kitchen style at home eoskitchen country home

images la dolce vita

3.  this chalkboard decal from chiasso.  if you’re scared to used chalkboard paint on your walls then this is the perfect alternative.

image

4.  i’m not loving this sofa from cb2 but i’m really, really liking it.  it’s definitely growing on me especially since it’s 40” deep.  this could be a really close contender to the one i posted last week that i want for our living room.

image5.  this amazing artwork from restoration hardware by atlanta-based artist todd murphy.  todd is actually a friend of a friend of mine.  i’ve never met him though.

 Dress Straw Artwork by Todd MurphyElephant Straw Artwork by Todd Murphy

Goose Straw Artwork by Todd MurphyHorse Straw Artwork by Todd Murphy

Thursday, March 25, 2010

Marble and Alabaster Lamps


It's funny how collections can sometimes begin. You purchase something because perhaps you got a good deal, or perhaps it's just that you're in a particular mood. Then suddenly, you're out and about again and see another one of similar nature but beautifully different...and your collection begins.

The above marble lamp was the first piece of my new collection. It had been at this particular antique store for awhile and finally, when it was marked down to $36, I thought perhaps I'd give it a try. And so my collection began...


It sits on the dresser in my office and has a wonderful three way light that is able to illuminate the small room. I love its skirted detail.


With this lamp, my collection grew to two. The tag in the antique store said it was marble but it could possibly be alabaster, I can't tell. It rests on the old writing desk in the den, which required a lamp base that was small enough to sit on the folded desk top.


I love the sweet carved detail and its wonderful creamy color.


Marble and alabaster lamps can be hard to find in good shape. I see a lot of them with broken necks that have been glued back together and/or badly chipped bases. Even with damage, prices are usually between $95 to $169.


This one sits on our bedroom dresser upstairs. I like the contrast between the white marble body with the veined marble base.


This one is the latest addition to my collection. It is by far the heaviest, and the tallest. It's waiting for a lamp shade, something I'll need to drive into the city to get. It could also use a good rewire -"Joan, help!!" Or should I say, "Dan, help!"

So what collection did you stumble upon?

Pray tell.

Wednesday, March 24, 2010

A Scarf for Spring ~Tea Rose Home Style~


I found this dress at a thrift store a few month ago. Although, the style of the dress is a little 80's ish, I fell in love with the gauze material and the romantic floral print. I have been looking for gauze material, but they are really hard to find.


I bought the dress, so I could make something out of it. I had lots of ideas, but it was very difficult to decide what to make. Once the dress is cut, that's it! It's not like I can go back to a fabric store and buy more.

Then, I started seeing beautiful scarfs for Spring at the stores. I had to make one with the fabric!

I separated the top and the bottom...


Actually, the skirt portion was made out of four large panels. I only needed to make my scarf.

1. I cut the panel in half, and sewed them together to make a long piece. Then, I just used a zig-zag stitch for both sides to prevent fraying.


2. Then, I pulled threads using a pin.


3. When I pulled about 2 1/2" worth of threads, I took sections of threads and twisted them together to make fringe.


4. Now I have a airy and romantic scarf for Spring!


I love it!! I still have three panels left. I am debating whether to make a blouse or camisol. Are you wondering what I did with the top portion of the dress? (I have a hard time throwing beautiful fabrics away).

I actually made some flowers, I can either make it in to hair accessories, make corsage, or use them to dress up my t-shirt.

In my next post I will show you how I made the flowers. Don't miss it! ;)

Pretty Scrapbook Paper Covered Magazine File ~ Tutorial


I'm in the midst of needing to re-do my sewing/crafting/office space - it needs it - desperately!!  If you came into my house right now I would be so embarrased.  I have a gazillion yards of fabric everywhere and have taken over the entire dining room and office.  I am the type of person that needs my space to be organized and put together in order to feel like I can move ahead and create.......well right now, I should be at a stand-still because it is a disaster!

So in an effort to start to re-do my "studio" (that's what we'll call it.......sounds good, right?), I decided to start with an easy project.  Several years back I had purchased some inexpensive cardboard magazine files from IKEA - these to be exact:

They are only $2.99 for a pack of 5 - a bargain!!  But look at them.......they are screaming for some color.  So here is my overhaul project for these great deal, but not so pretty, magazine files.

Pretty Covered Magazine File Tutorial

Supplies:
-Magazine files
-Pretty scrapbook paper
-Glue
-Scissors or a paper cutter
-Pencil or pen

Directions:

Grab your scrapbook paper.  I used Amy Butler's scrapbook pack so that I would have a bunch of designs and colors that all coordinate and you know how I feel about Amy Butler (love her)!

Get out a sheet of 12 x 12 paper.

Flip your paper over and trace (with your pen or pencil) around the long-side of your magazine file.

This is what it will look like after you have done your tracing.

Use your paper cutter (or scissors) and cut out what you traced.  If you don't have a paper cutter, I highly recommend getting one.  They are pretty inexpensive (especially if you use your 40% off coupon at Joann's or Michael's) and if you plan on doing much crafting at all, it is well-worth the money.

Here is your long front piece cut out and ready to go.

Take your glue and place it all over the side of the file and place your long piece on top (be sure to line it up perfectly).  I just used your basic glue, but the stronger the better.  Another idea is to use Mod Podge for this project - if you are into that sort of thing.

Now you could stop here, as you really will only see the front of the file if you keep these in a bookcase, but I decided to take it a few steps further and cover the entire file box.  For the sides trace each one on another piece of scrapbook paper.

Use the first one you cut out as a template for your second.  You need two in order to cover both sides.

Again, swirl glue all around the side of the file and place your pretty paper on top.

For the other small piece, use a scrap from the first long-piece we cut.   Trace the same as the other pieces.

Here is what the smaller side of the file should look like.

To add your labels, I cut small pieces of neutral cardstock (approx. 1" x 3") to back my printed labels.

For the printed part of the label, I used my label maker (oh how I love my label maker!), but if you don't have one, just print your text out on your computer or hand-write it.

Place your labels all at the same height on the long-side of the file. 

Here is what your pretty magazine file will look like after it is complete.  Looks like it cost a lot more than the 60 cents that I paid for each file, right?

Here are some more files that I did as well in coordinating Amy Butler scrap paper.


These files just make me so happy, now if I could just get the rest of my "studio" to make me this happy!!