Wednesday, March 31, 2010

Link Party Time!

After giving much thought, I decided to try hosting a link party regularly. It will be every Wednesday, and next time I will make sure that you can start linking from Tuesday night. I can't say that I will do a giveaway every time, but if I have something, I might, so who knows... I think it will be fun to see what everyone is up to and to get to know more of you.

Before I start the party, I will share my latest project first... I have been working on this baby blanket for the last couple of days. Christopher's teacher is going to have her first baby soon, she has been such a wonderful teacher for him; I wanted to do something nice.

I love making baby blankets like this. They are quick projects, I get to play around coordinating fabrics, and I looove the feel of minky while I am working on it.

For the back, I used the same minky shown in the picture. There are zig-zag stitches on the edges.


I hope she and her baby boy will like it...


Ok everyone, it is your turn! The rules are simple:

1. Please post something YOU made. It doesn't matter if it is crochet, quilt, clothing, anything would be fine. I want to see it!

2. Link to your specific post, that way it is easier for everybody to find and read it.

3. Please grab the "Tea Rose Home" grab button, and link back from your post. If you can mention the party in your post or place the button on your side bar, that would be great! I want more people to have a chance to come and show off their creation.


4. One more thing, please DO NOT link anything inappropriate or any kind of advertisement.

Go visit people on the list and say hi! I can't wait to see your projects!

Easy No-Sew Applique Tutorial


As I have mentioned in previous posts, it is "birthday season" around here.  My daughter's 12 little friends all have their birthdays within a month of each other.  Well this weekend is the grand finale of all the birthday festivities!

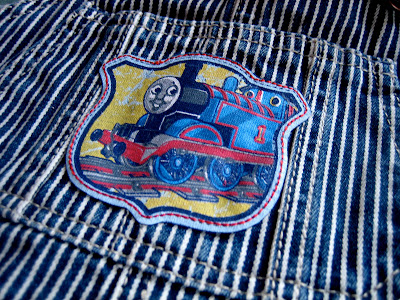
This weekend my friend Danica's little guy, Roaran, will celebrate turning 2 and will finally join his friends in the "2" club!  She is planning an awesome "Thomas the Train" party that I'm sure will be amazing.  She wanted to jazz up his basic train overalls to make them "Thomas" themed and I agreed to help her out with this little project.

This is a simple, inexpensive no-sew (or a little bit of sewing if you want) project.  This would be perfect for your child's jeans, a little jacket, a t-shirt or anything you are wanting to add something to, just to make it a little bit more special.

Easy No-Sew T-Shirt Applique Tutorial

Supplies:
1 pair overalls
1 T-Shirt (whatever theme you like....Thomas, Elmo, Dora, Mickey Mouse)
Fusible Web (WonderUnder or any other brand)
Scissors
Iron
Thread

Directions:

Start with your basic overall.  Danica picked out this super-cute classic train overall.

She then found this "Thomas" shirt at a local children's resale shop in town.  It's a cute shirt, but she (and I) didn't care too much for the fact that it was a tank-top and looked a little too plain for a birthday boy.


I cut the "Thomas" and the wording off of the t-shirt as close to the edge as possible.

I then cut fusible interfacing out to match the shape of each of the cut-outs from the t-shirt.

I ironed the interfacing to the back-side of each of the t-shirt applique pieces (follow the directions for whatever brand of interfacing you use).  Then I took the paper off of the back of the appliques.


I placed the applique pieces where I thought they would look best and ironed them into place. 


I appliqued the picture of Thomas on the front pocket of the overalls and the "Thomas and Friends" onto the back-side.


You can stop after you have ironed on your applique, but I like to take it a step further.  I stitched around each applique piece after ironing, just to increase durability.  If you know anything about toddler boys, they are super-rough on their clothes so this is a good idea if you plan on having your little one wear these after the party.

The nice thing about using knit t-shirt material for the applique is that you don't have to worry about the edges fraying like you would with regular quilting cotton.

Hopefully Danica will be "guest" posting about her fabulous "Thomas" party in the coming weeks!!

Cottage Mama's Note:  The next time you are out at a garage sale or resale shop, look around for t-shirts that could be deconstructed for their applique potential.  Maybe your child likes Elmo or Diego or Barney or simply look for t-shirts that have pretty flowers or designs.  This Thomas shirt was not particularly special, but once I took it apart and added it to the overalls, it became just that!!

CURIOSITIES IN SCIENTIFIC NAMING


(Image of Phialella zappai from here)

The jellyfish Phialella zappai was named by Ferdinando Boero as part of his plan to get to meet Frank Zappa. "There is nothing I'd like better than having a jellyfish named after me," Zappa replied. And so they met. (The long story, well worth a read, here.)

Binomial nomenclature is not supposed to be humorous. Yet a few odd scientific names slip by the International Code of Zoological Nomenclature. Entomologists seem bugged by congenital punning. At least one marine biologist favored magic. This list of favorites is from Deep Type Flow.
  • Agra vation (a beetle)
  • Colon rectum (another beetle)
  • Ba humbugi (a snail)
  • Aha ha ( a wasp)
  • Lalapa lusa (a wasp)
  • Leonardo davinci (a moth)
  • Abra cadabra (a clam, now, alas, in the genus Theora)
  • Gelae baen, Gelae belae, Gelae donut, Gelae fish, and Gelae rol (all types of fungus beetles)
  • Villa manillae, Pieza kake and Reissa roni  (bee flies)
  • La cerveza (a moth)
  • Ytu brutus (a beetle) 


      Curioustaxonomy lists several palindromes, including:
      • Orizabus subaziro (a scarab beetle)
       Plus an extinct pterosaur named for an extinct author:
      • Arthurdactylus conandoylensis
      Plus an extinct fish named for the famed British documentarian who gave it its 15-plus minutes of fame:
      • Materpiscis attenboroughi


      (Model of Materpiscis attenboroughi at Museum Victoria 2008)

      Curioustaxonomy has a lot more puns and plays on words:
      • La cucaracha (a moth)
      • Phthiria relativitae (a bombyliid fly)
      • Pieza rhea (a fly)
      • Vini vidivici (a recently extinct parrot)
      In the section on unused names: 
      • An anthropologist, noting that the group including African apes is named Panini, suggested in jest that the subset of those which have language should be called Linguini
      Strange and poignant, the irukandji jellyfish named for American tourist Robert King, whose death from its sting highlighted the heretofore invisible danger of a species no bigger than your fingernail:
      • Malo kingi


      (Photo of Malo kingi by Lisa-ann Gershwin)

      Plus a short poem celebrating taxonomy's longevity:

      A Discovery
      by Vladimir Nabokov, 1943

      Dark pictures, thrones, the stones that pilgrims kiss
      Poems that take a thousand years to die
      But ape the immortality of this
      Red label on a little butterfly.


      ANTARCTICA UNDERWATER


      Huge forests of nasty-tasting kelps, plus soft corals, sponges, tunicates, and really really cold water.

      Pink, Silver and White


      As the ranunculus started to show signs of fading, I trimmed their stems and gathered them up into two small arrangements. I just love, love, love the combination of the pink, silver and white on the kitchen shelves.


      I also love how their centers look like the little bum of a bumble bee.


      What I love most about flowers is their heavenly power to completely embrace you with their intoxicating beauty.


      I left the milk glass vase arrangement on the kitchen shelf...


      ...and placed the mint julep arrangement on my nightstand so that I may open and close my eyes to their mesmerizing beauty.

      Tuesday, March 30, 2010

      The Cottage Mama is in the Mommyhood!


      I'm so excited that Shannon over at luvinthemommyhood.com has posted this lovely feature/interview about my family, myself and my etsy shop "The Cottage Mama".  Yes, that's right, I have an etsy shop!  I know I haven't officially talked too much about my shop here on the blog, but I just recently got some inventory listed and I'm open for business!! 


      I am doing a giveaway for a $25.00 gift certificate to my shop over at luvinthemommyhood.  I would love if you would head over to luvinthemommyhood, check out the interview and enter to win!!  You will also learn lots more about "The Cottage Mama".  While you're over there, take a few minutes to poke around Shannon's blog - she has some wonderful projects, ideas, and gorgeous pictures!

      If you would like to keep updated with "The Cottage Mama" become a fan on facebook.  Click here to become a fan!

      Monday, March 29, 2010

      Water, Pure and Simple


      Shortly after our indoor plumbing was updated, I sent a water sample out to be tested. Although the test results were good, we felt more comfortable taking the cleanliness of our water one step further.

      Our concerns were centered on the old water lines that supply our house. Despite updating our all of our property's water lines, the main line that runs to our house is old, very old. And old pipes aren't the cleanest.

      So Hubby installed an under counter filter. It is plumbed into the cold supply line under the sink so now every time we get a glass of water, fill up the tea pot or steam rice...the water is filtered. Even our little Lucy will reap the benefits of cleaner water.

      We opted for this model here, from Best Filters.

      I like that this model allows you to have the benefits of filtered water without the visible hardware that usually goes along with it. We prefer sparse and simple in our kitchen so using an under counter filter was the perfect solution for us.

      Filters are replaced once a year.

      Cheers!

      orla kiely at one kings lane

      i really like the orla kiely journals, composition books and stationary sets that are on sale over at one kings lane.  they get me in the mood for spring…as if i needed any help with that.  i’m not a journal person but if i were i would buy up every single one.

       image image

      image image

      imageimage 

      LiveJournal Tags: ,

      A Story of Statement Jewelry

      A few weeks ago, I was watching a short documentary on the Japanese channel. It was about jewelry artists living in NY. They introduced a few designers, all of them had a common ground. They make "Statement Jewelries".

      Usually, statement Jewelries are big, bold,and most of the times inexpensive compared to its size (Think of a diamond, people pay how much for a tiny stone?). In the documentary, the reporter also said that statement jewly become popular when the economy is not doing so great. During the Great Depression era, statement jewelry was a big trend. I guess people were after the "Wow" effect and something to cheer them up for a price they still could afford.

      I thought about our economy now... hmm... that make sense. Those statement jewelries are everywhere. I usually perfer small real jewelry. BUT, I see so many pretty necklaces, earrings, and rings to drool over. They sure make a plain outfit shine.

      I particularly liked one desinger who collects antique parts and pieces to make her original jewelry. She showed some of her collection. My eyes went wide, while hold a dust rag in my hand (I was dusting the furniture). Wow, they were truly a piece of history.

      I have been itching to find my own statement jewelry pieces. I am no expert with antiques. Nor, can I tell the difference when I find something; what is "old" and what is "vintage". They sure sound sooo different. Although, when I see something I can immideately tell if I love it or not. If I think it's beautiful, that's good enough for me.

      The other day, I found two jewelry pieces that I fell in love with at a local thrift store. They are unique and my style. Above all, they were $2.99 each!

      A pair of earrings with rose print...


      Then, this gorgeous pendant head with dainty detailes.


      Lucky me! I found a chain that would match with the pendant in my jewelry making box! I can start wearing it right away:) Next time when you go visit a thrift store, or yard sale, look around a bit carefully, you might find a piece of history too.

      Sunday, March 28, 2010

      color scheme

      i saw this color scheme in last months fresh home magazine and was immediately drawn to it.  i can’t wait to use it in someones home.  

      color-scheme

      Ranunculus


      My Mom always planted ranunculus in my Grandmother's garden every spring. I always think of the them oohing and ahhing over these full feathered flowers whenever I see them.


      They make me smile...them and these.

      I wish they'd last forever.

      Friday, March 26, 2010

      Boys.........


      If you have been following my blog here for very long, you know that most of the things I post about (when it comes to children) has to do with girls.  I'm sorry, I can't help it, I have two of them!!

      Well, I have been working on some birthday presents for my daughters little friends and they happen to be mostly............boys.  I love to make Savannah's little friends handmade gifts for their birthdays.  Now it is not always possible to make ALL of them totally handmade, but I try my best.

      I'm a huge fan of making super-hero capes for the little ones, but here are some other gifts I made recently that will be given to my daughter's 2-year old "boyfriends".

      The Car Cozy:
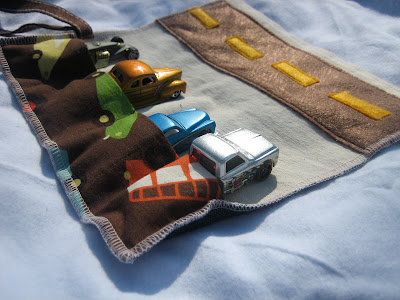
       I love this gift idea!  I think this is so perfect for a little guy on the go.  Mom can take this simple "Car Cozy" in her diaper bag or purse and whenever she needs to entertain the little guy, she can pull it out and he can have instant fun! 

      I based this design off of the "Car Cozy" tutorial by Homemade by Jill.  So if you are interested in making this gift for someone, I definitely recommend checking out her tutorial - it's great and very thorough.  I did change it up a bit, so I'll let you know what I did.

      As you know, I love toys that encourage imaginitive play and this one is perfect.  You've got the street and the different cars - so much fun!

      I used brown and yellow felt to make the road.  And used Riley Blake's new "Wheels" line for the fabric to hold the cars.  The light khaki color is a thick cotton twill.


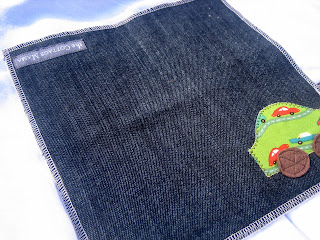
      I appliqued a car out of fabric (again, Riley Blake "Wheels") and sewed wheels made from felt to the exterior of the "Car Cozy".

      For the exterior, I used a thick denim.  This would be a great idea for recycling a used pair of jeans that you are no longer wearing.

      To speed up this project, I used my serger to sew around the entire exterior.  Homemade by Jill's tutorial does not use a serger.  I know many of you don't have a serger, but if you do, I think this is the way to go!


      For the tie, I used two pieces of felt ribbon that I got at my local Michael's.

      To close the "car cozy" you fold it in half (as you can see, I included my "The Cottage Mama" label).

      Then you fold it in half again and secure with the tie.

       I think any little guy would be thrilled to receive this gift - Vroom, Vroom!!!

      Charm Square Car Bean Bags:

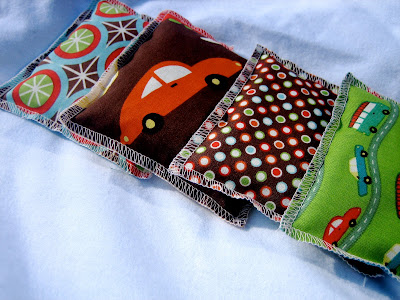
      I included these four bean bags in one my my daughters friends gifts.  The main portion of the gift was a tote with a bunch of outdoor sand toys and I thought these bean bags would make for some additional outdoor fun!

      These four bean-bags were all made from charm squares of fabric.  I made one side from Riley Blake "Wheels" fabric.

      And on the other side I used a fun polka-dot in "boy" colors.

      Again, if you have a serger this makes for a super-simple project.  Just serge three sides of the fabric together, fill with beans, and then serge the fourth side.  I finished all of the corners with fray-check to prevent future fraying.

      If you do not have a serger, place the right-sides of the fabric together and stitch three sides (1/2" seam allowance), then turn them right-side out and press your seams.  Fill with beans, and hand-sew the fourth side to close the bean bags.

      I used an entire bag of beans for these four bean-bags.


      Cottage Mama's Note:  Since this wasn't a full tutorial, if you have any questions about these gifts, feel free to leave me a comment or send me an email.