Saturday, July 31, 2010

Link Love No.17

Looks like so many of you have been busy during the last week as well! There were 135 links to go through and that is our link party record. Thank you so much for participating in my link party everyone!

There are many of them that I liked but I had to choose a few to spot light for this week...

Dots and Stripes made these adorable baby shoes by using Debbie Bliss's quick baby knits pattern. Aren't they so cute? They will be perfect for coming up seasons.


Check this out. This eye chart was created by She Wears flowers. I thought this would make a fun and unique gift and decore for homes. She shares how she made it in her post.


Sarah from Welcome to the Good Life shares how she made this pretty necklace inspired by Anthro. I like her version much better to tell you the truth. Great job!


These adorable twin aprons are made by en ØBY ting. I can't understand a word on her blog, but she has lots of inspiring pictures. I love the fabrics she used for this project!


I couldn't resist picking this one... Scraps N'Strings shares her tutorial how to make this irresistable Tag-a-long Lion. It looks so simple and easy to make, and the results are awesome! My boys love to read Calvin and Hobbs, and I know Hobbs is a tiger, but this lion reminded of me that comic.


Thank you so much everyone for sharing your talents in my link party! Happy creating. :)

Friday, July 30, 2010

Show and Tell: Gathered Ruffle Camera Strap Cover


Remember a month or so ago when I told you about my new baby (my new DSLR camera - Canon Rebel T1i)?  Well, I have seen a gazillion cute camera straps around the internet lately and I thought "I want one!".  So today I decided to make myself one for my new camera.

I've seen a lot of great tutorials, but nothing was exactly what I was looking for, so I just decided to go for it and make my up my own little design with a little inspiration from here and there.


I used fabric from designer Anna Maria Horner.  When I was first introduced to this designer I was not initially won over by her work (sorry to say), but now I LOVE it!  I guess it's grown on me - I love the eclectic mix of patterns she uses with vintage, geometrics and florals.


I used a piece of woven trim that I purchased at a very old local fabric store.  I don't know if it is vintage or not, but it's old and I just loved its charm.


I wanted my camera strap to be slightly padded so I added some fusible fleece to the under-side.  I'm very happy with the amount of padding this gives the strap cover - not too much, not too little.


I used a gathering stitch on the top layer (don't worry if you don't know what that means, I promise to cover that in my "Sew Basics" series) and stitched the ribbon down the center of the ruffle.  I then sewed the top layer to the bottom layer (right-sides together) and turn it right-side out to reveal the completed camera strap cover.


On the inside I stitched in my label - The Cottage Mama.  It's so fun to have your own labels!  Even if you don't sell the things you make, I highly recommend purchasing some for any of the gifts you give or the clothes you make.  I feel so proud when I see my girls wearing "The Cottage Mama".


And there's me - "hi there!" sporting my new, hip camera strap cover.  I designed, cut, and finished this camera strap during naptime today, so it sewed up pretty quick.  If you have a boring camera strap right now, why not take a little time to make yourself something special, I'm sure you deserve it!!


Have a great weekend!

Cottage Mama's Note: Since there are so many tutorials out there on making camera straps, I figured I would just kind of tell you what I did.  If you have any questions about how I made mine or if you would like a tutorial just leave me a comment or email me (thecottagemama@gmail.com).

Thursday, July 29, 2010

Four Shirts Four Ways ~ Light Beige ~


Hi everyone! This is my last of the four t-shirt makeovers and I really had a hard time deciding what to do with this one. Since this is one of my favorite colors I really wanted to make something I would wear all the time, rather than experiment and oops, I don't think I am going to wear this...

So, after thinking it over for a while, I have decided to do one of my very favorite styles. Remember my original ruffle shirt? I used the same idea, but changed it a little bit to give it more of a boutique feel to it.


{You will need}

Two of the same shirts
Matching thread
About 4 yards of lace (mine is a little less than 1/2" wide)
Two small buttons

{How to}

1. Lay the shirt flat on the cutting board and cut the t-shirt. Cut the bottom, cut the middle part into five parts, that are 2"wide.


2. Take four out of those five loops, cut both sides off to make 2" X 14" strips. The last loop needs to be longer than the others, so cut just one side off. This one will be the ruffle to go on the front neck line.


3. Add lace to the bottom of the strips using a zig-zag stitch.


4. Seal the edges with fray check.


5. Make ruffles. Stitch one side with the largest stitch setting on your sewing machine. Pull one thread to gather the fabric.


6. I wanted to bring the neckline higher for this design, so I cut the very bottom piece of fabric to fill in the v-neckline. Sewed with zig-zag.


7. Pin the longest ruffle to the neckline. I decided not to go all the way around the neck, so when I wear this shirt in the Fall with a cardigan, the back won't be so bumpy.


8. Keep adding the ruffles. Make sure that those ruffles will overlap each other a little bit.


9. Lay the t-shirt flat on table and mark the middle part of the sleeves. Fold the sleeve and stitch two places to secure the pleats. Add button.


10. I made some flowers with the leftover fabric pieces. Although, I couldn't decide if I liked the t-shirt with flowers or without. So, I made it in to a corsage...


Many places are having such good sales on summer items right now. If you find great deals on t-shirts, that will be your chance to make a one of a kind shirt for yourself on a small budget! My Four Shirts Four Ways challenge is over, but I will be doing more t-shirt makeovers in the future. They are lots of fun!

Wednesday, July 28, 2010

Easiest 10-Minute Throw Pillow


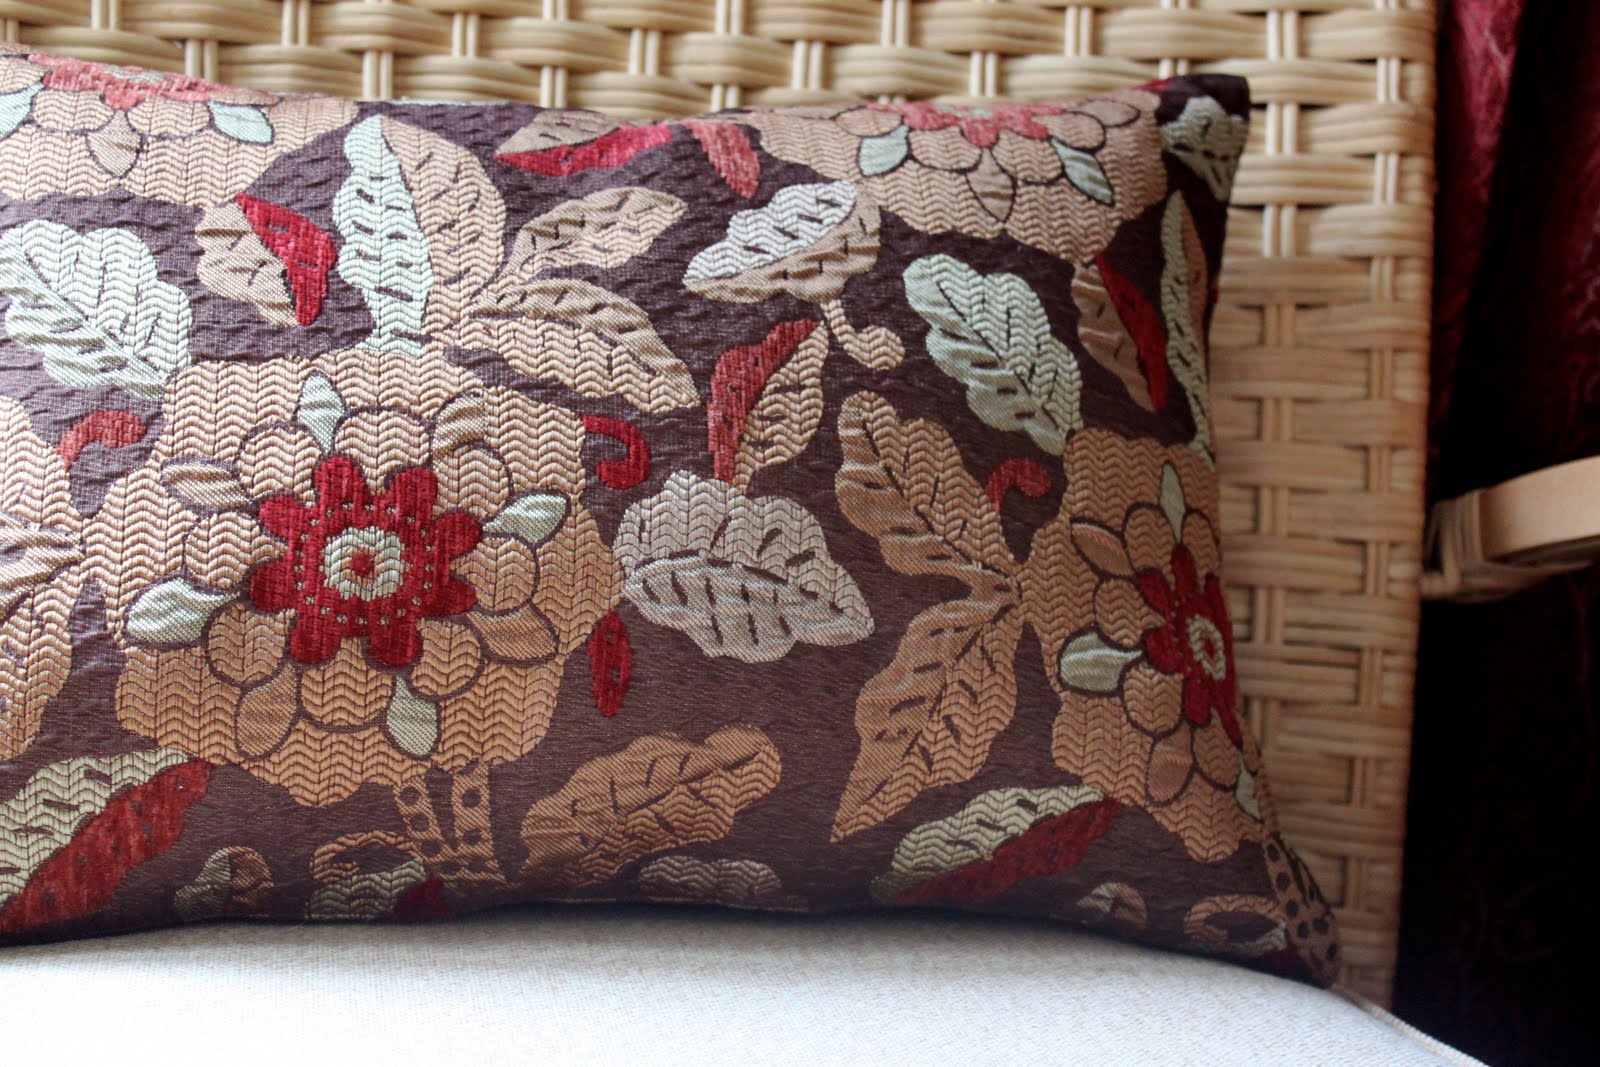
Would you believe me if I told you that the pillow pictured above was originally a placemat?  Well, it's true!  I got this placemat today at Pier 1 on sale for $3.10 (including tax).  I turned this beauty into a pillow in less than 10 minutes, yes, LESS than 10 minutes.  Even if you don't own a sewing machine, you can do this little project - just get out your seam ripper and hand-sewing needle.

Like I said in my previous post, I have really been into sprucing up The Cottage Home, but with being a stay-at-home Mom, I am usually on a pretty tight budget.  So I am doing the best with what I have (rearranging things galore) and adding in the occasional thrifty find.  I am so excited about this project and I hope you will be too!!


10-Minute Throw Pillow Tutorial

Supplies:
1 double layer placemat
Seam ripper
Fiberfill or other stuffing
Sewing machine or hand-sewing needle
Thread

Directions:
Grab a standard-size placemat.  I got mine at our local Pier 1 (though I was inspired by all the pretty things I've seen in the Potterybarn catalog lately).  Perhaps you have a placemat on-hand or check out any of your favorite stores - I guarantee a place mat will be FAR less expensive than a pillow but will still have the same style as your favorite store.


I picked this placemat because I loved the texture and the colors (our family room is deep red, brown, tan and green).  Make sure you choose a placemat that has two layers - a top layer and a bottom layer.  Some placemats are trimmed with bias-tape.  Try to stay away from those for this project as it will only make your life more complicated.


Here's what the back of my placemat looks like - just a simple, solid brown.


Remove the tag from the placemat.  I decided this would be a good place for me to open up both layers as it already looked a little wonky to me.  But you can open your placemat any where you see fit.

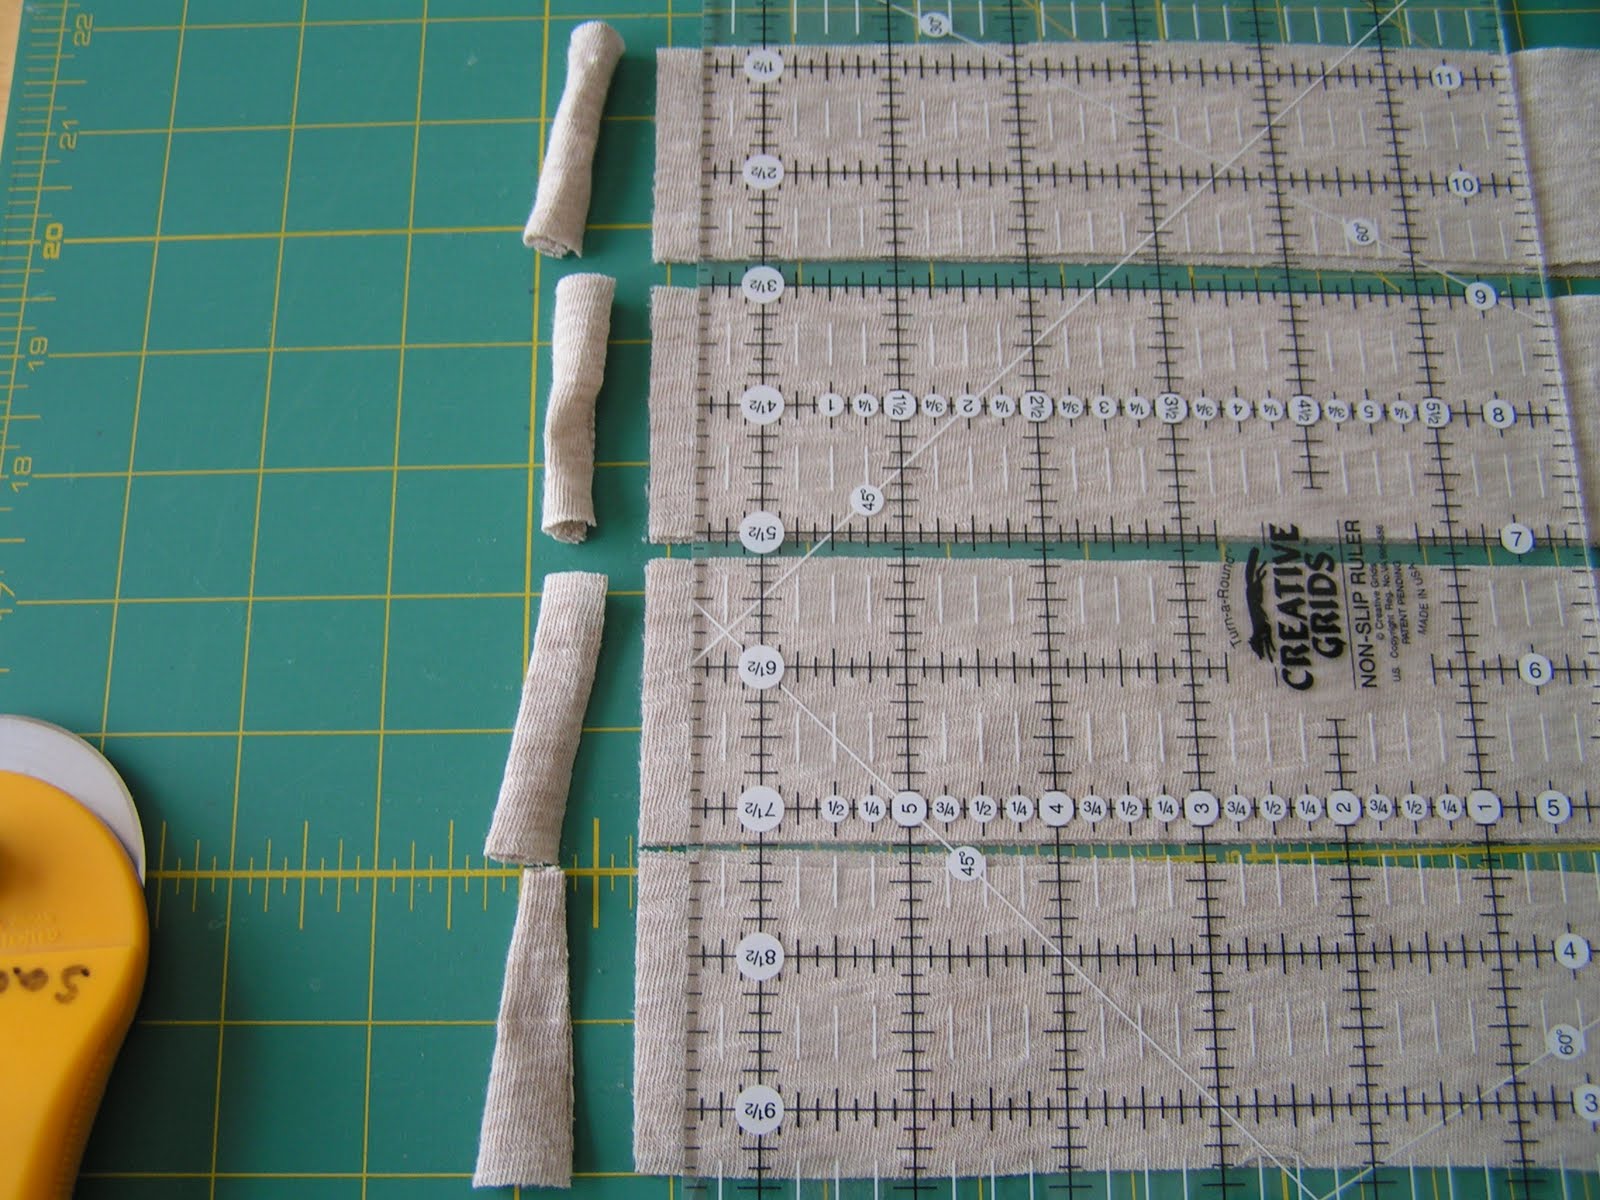
Take your seam-ripper and carefully open up your placemat.  Open a hole large enough for you to stick your hand through.  You need to be able to get your hand inside to stuff the pillow.


This is the size hole that I ended up with after opening up both sides of my placemat (I have kind of small hands).


Take your fiberfill (or whatever stuffing you are using) and fill your placemat.  Keep filling until you are satisfied with the look.


After you have filled your pillow, pin the opening shut.  I know my pinning is not entirely proper here, but just do your best to pin the opening closed.


For the next step, if you have a sewing machine, line up the original stitching and close your opening with coordinating thread.  Mine was a 1/8th seam allowance.  If you DO NOT have a sewing machine, hand-sew the opening closed in coordinating thread.


Here is what the side of my pillow looked like after I closed the opening.


And there you have it - a pillow in less than 10-minutes - does it get any easier than that?  Well, not for $3.00!!


I saw some placemats at Pier 1 with some fabulous beaded trim on two sides - that would make a totally cute addition to a pillow, don't you think?.  Hmmmm.......my wheels are turning.......perhaps I need another placemat or two.  What about you?  Will I see you out tomorrow picking up a placemat?

Have a great night!

Cottage Mama's Note:  I have seen several different versions of this type of pillow on other websites such as Thrifty Decor Chick and I'm sure there are others out there too!  Everyone has their own version, so feel free to check out some others and see what works best for you!!

my dream kitchen

if i could build my dream kitchen i would build one with very few or no upper cabinets.  i like the look of shelving but think i could do without them completely.  while i was browsing through my kitchen inspiration files i realized how many kitchens i have saved that don’t have upper cabinets.

celebrity-homes-photos-meg-ryan-03 elle decor {meg ryan’s home in elle decor}

i love the task lights above the sink in this kitchen.

Adrian Kahan's home Ralph Lauren elle decore

{elle decor}

so pretty.  this one is neck and neck with my favorite one.

{lonny}

home-decorating-ED10090-SENK30-05

{elle decor}

kitchen-decorating-ideas-ss19

{elle decor}

Home: white open plan kitchen, dining area, room; stools, table, window, steel flooring, pendant light, cooker . Modern rustic. Pub orig L etc 11/2005 p86 Real home

{living etc}

ss_100035526

{unknown}

tupperlake6_thumb3

{unknown}

and my favorite…

ellen-pompeo-hollywood-home-ED0510-04 elle decor {ellen pompeo’s home in elle decor}