Thursday, September 30, 2010

Baby Boys and Robots


Is it just me or does it seem like there are a ton of babies being born during this time of year?  It seems like all our friends have been having babies left and right......as a matter a fact our good friends Patrick and Anita just had a new baby today.......baby Lucy!

As I've mentioned before, I've been busy getting my inventory ready for a show next week, but I have managed to find some time to whip up a few baby gifts here and there (and I have a couple more to do this weekend).  My friend Shannon just had her second baby boy so I thought I'd make her a little something special for her new little bundle........baby Kevin.


I made Shannon's baby boy, Kevin, this little robot gift set.  A custom appliqued organic cotton onesie and two cotton chenille burp cloths.


I love David Walker's "Robots" fabric - isn't it just so cute?  I'm not all that versed in boys, seeing as though I have two girlies, but I'm used to seeing cars, sports and dinosaurs for boys.  I think the robots are unique.  I used the applique techniques from this "Sew Basics" post for the onesie.


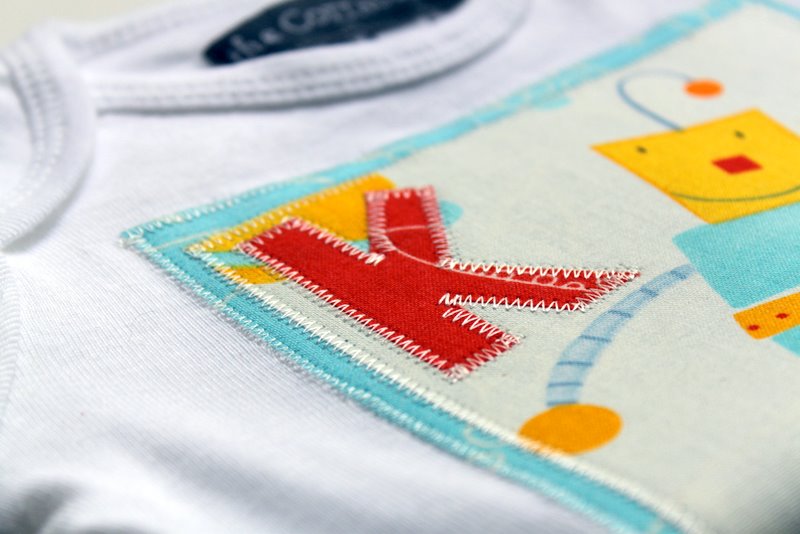
I used three fabrics for the applique.  The light blue for the border, the robots for the main fabric and the red for the "K" (for "Kevin").  I applied the applique with fusible interfacing and I used a medium sized zig-zag stitch around the edge to prevent any fraying. 

Do you want me to tell you a little secret?  I used embroidery thread instead of my regular thread for the applique and it turned out awesome!  I don't have a fancy sewing machine so I never thought of embroidery thread to even be an option for me, but this worked like a dream.


To go along with the "Robot" onesie I made a couple burp cloths.  And since I was making burp cloths, I decided to make a bunch for my show this next week.


These came together rather quickly because I used my serger.  I'm typically not a huge fan of a serged edge, but I think it works for boy things.


I used a wide variety of fabrics from David Walker's "Robots" collection.  I love how these can be put together as burp cloth sets.  I don't think I will be listing these in my etsy shop, but they will be great for shows and make wonderful gifts!


For the backing I used a super-soft cream chenille.  Chenille is definitely my favorite fabric for baby - so soft and cuddly but really durable as well.

Thanks for letting me share! 

  Do you know lots of people having babies during this time of year?  
What kinds of fun baby gifts are you making? 

Booster Seat Makeover (Costco)


Buying a new car made me realized one thing...our booster seats need serious TLC!

I know sometimes my boys will step on the booster seat (of course with their shoes on!!) to climb over to the back seat or to the trunk area to get something they dropped. I never really paid attention how dirty the booster seat covers were until I was trying to transfer everything from our old minivan to the new one. There were unidentifyable stains everywhere and it was just very nasty looking. Especially in the new car, those car seats looked so out of place.

I washed the seats and disinfected them while I threw the covers in the washer.
Guess what, those covers were still dirty looking even after the wash...

That's when I decided to make booster seat covers! One booster seat is from Costco, and the other one is from Graco. The Costco booster seat cover is just flat and looks very simple to make, and the Graco one is a little bit more work.


I will share what I did...

1. I made patterns first...


2. Cut out the top fabric, batting and backing by using the pattern. This costco one had tabs. I used vinyl (the kind that is used for table cloths and such) to make tabs. Lay the right side of the fabrics and batting together, and insert three tabs in place and pin. Using 1/4" seam allowance sew the one side together.
When you turn it inside out, the tabs will be sewn in.


3. Line up all three edges that are not sewn and flatten the fabric. Sew on the layered fabric to stablize them. I did 4" apart between the lines, this gives a quilt effect.

4. Sew bias tape on all three sides.


5. Make holes with an awl on the tabs and bottom of the cover. When I created the pattern, I also marked them on the paper to make things easier.

6. Done!


I love it! I couldn't use flower print (my boys would refuse to sit on it if I did), but I am happy that I got to use the fabric I already had and it came out better then I expected. I am working on the Graco one now, it is a little more work, but I can't wait to see them side by side in my mini van. :) Oh, before I forget, since I used vinyl for the tabs, I will not be able to put it in the dryer. I just realized this as I was writing this post. So use something else for the tabs, and if you find any better material for that, let me know! :)

AIR PLANKTON


Drifting on currents of air and gravity above Norway. 

Wednesday, September 29, 2010

Happy Birthday Pumpkin


Hubby (also known as Mike or Sweetie...or for this post, Pumpkin), has celebrated another birthday. He's forty (again). He's decided to stick with forty for another year...or so, and I couldn't help but oblige him.


Here's the Birthday Boy.


I made him a Pumpkin Spice birthday cake using pumpkins from the garden.


It was really delicious...moist and rich.

This is the recipe I used.

Happy Birthday Sweetie!

SEA HAAR


The Unseen Sea from Simon Christen on Vimeo.

I like fog more and more with every passing year. Comforting, moody, cool, quiet, private.


This image, courtesy Wikimedia Commons, is of fog droplets jumping around at just below freezing temperatures.

Here's a high-speed image of the same fog, shot fast enough to slow the "particles" down and stop them in space. Like air champagne.


This beautiful true-color image posted by the Earth Observatory is of sea fog off Scandinavia in March 2003.


This one is too, from a day earlier.


In really cold weather, usually below −35°C/−30 °F, ice fog might form. Sometimes ice fogs triggers light pillars, as seen in this photograph. What looks like a lens flare on the camera is actually a pillar caused by the reflection of sunlight from ice crystals that happen to have nearly horizontal, parallel, flat surfaces. Therefore it really is a lens flare, only the lens is our atmosphere. 

The photograph was shot somewhere in the Arctic, courtesy NOAA.

Some fogs make white rainbows, known as fogbows. Tecnically, a fogbow is just like a rainbow only made of  very small water drops less than 0.05 millimeter in diameter. Sailors call them sea dogs.

The droplets of a fogbow are so small, according to APOD (whence this photograph hails):

"that the quantum mechanical wavelength of light becomes important and smears out colors that would be created by larger rainbow water drops acting like small prisms reflecting sunlight with the best angle to divert sunlight to the observer."

Writing like that is exactly the reason I have a job.

Photo from here.

In Scotland and northern England sea fog is also known as haar or fret. Old Saxon words. 

Most haar condenses around the nuclei of salt particles, which are the by-product of salt spray, which is the by-product of wind and waves.

Photo from here.

In a recent discovery, researchers from Scotland's Dunstaffnage Marine Laboratory found that haar also condenses around the iodine particles released by kelp. The kelp emit iodine when stressed by sunlight and evaporation. Thus they help make weather they like better.

Here's the abstract of the paper:

Brown algae of the Laminariales (kelps) are the strongest accumulators of iodine among living organisms. They represent a major pump in the global biogeochemical cycle of iodine and, in particular, the major source of iodocarbons in the coastal atmosphere. Nevertheless, the chemical state and biological significance of accumulated iodine have remained unknown to this date. Using x-ray absorption spectroscopy, we show that the accumulated form is iodide, which readily scavenges a variety of reactive oxygen species (ROS). We propose here that its biological role is that of an inorganic antioxidant, the first to be described in a living system. Upon oxidative stress, iodide is effluxed. On the thallus surface and in the apoplast, iodide detoxifies both aqueous oxidants and ozone, the latter resulting in the release of high levels of molecular iodine and the consequent formation of hygroscopic iodine oxides leading to particles, which are precursors to cloud condensation nuclei. In a complementary set of experiments using a heterologous system, iodide was found to effectively scavenge ROS in human blood cells.


Photo from here.

And since sea urchins stress and control kelp (by eating them), and since sea otters control sea urchin populations (by eating them), then urchins and otters are important players in the fogweb too—at least in the Pacific.


Photo from here.

The paper:

  • Frithjof C. Küpper, et al. Iodide accumulation provides kelp with an inorganic antioxidant impacting atmospheric chemistry. PNAS.

New Sponsor and Giveaway - Elizabeth Victoria Fine Stationary


I'm so excited to announce the newest sponsor of The Cottage Home - Elizabeth Victoria Fine StationaryElizabeth Victoria is giving away a gift certificate to their shop to one lucky The Cottage Home blog reader.

Want a chance to win?

Click here to read more about our great new sponsor and enter to win this wonderful giveaway.

Link Party No. 25!


At the beginning of this year, I promised myself that I would not buy fabrics (well, within the reasons...maybe occasionaly...) and use whatever I have on the shelf instead.

So, I was going through my shelf and decided to make another swaddle blanket. I also made a burp cloth with the leftover marterials. I have so many other things on my "To do list" and this was certainly NOT on the list, but when I saw the fabric combinations, I couldn't help but sew it. :)


I have a few other on going projects I will share the pictures when I am finished. :)

I can't believe it is almost October, I love fall but I don't know if I am ready for the busiest months of the year!

I am so excited to see what you got for this week!

1. Please post something YOU made. It doesn't matter if it is crochet, quilt, clothing, anything would be fine. I want to see it! If you use someone's idea or patterns please give them the rightful credit.

2. Link to your specific post, that way it is easier for everybody to find and read it.

3. Please grab the "Tea Rose Home" grab button, and link back from your post. If you can mention the party in your post or place the button on your side bar, that would be great! I want more people to have a chance to come and show off their creation.


Tuesday, September 28, 2010

inspiration

image

i’m completely inspired by this new atlanta home that was featured in this month’s atlanta homes & lifestyles magazine.  the mix of rustic and classic styles is very intriguing.  it keeps me wanting to see more and more.  the website doesn’t have near as many photos as the actual print magazine has so pick it up if you see one in a store.  it’s absolutely stunning in print.

image

this kitchen is to die for…everything from the urban electric co. lighting to the limed wood backsplash.

image

image

the entire home is design at it’s best.

Monday, September 27, 2010

Embroidered Reusable Snack Bag Tutorial


I have been wanting to make some reusable snack bags for my girls for about six months now.  Today I finally took the initiative and got some made (it's about time, right?).  I made these today partly out of necessity (we are out of plastic sandwich bags) and partly because we are taking a road trip down to Tennessee next week for me to do a show for "The Cottage Mama" and I just thought they would be great for the car ride.

There are about a gazillion tutorials on the internet for these reusable bags (there are some really great ideas out there).  But as it is with most things for me, I didn't find exactly what I was looking for.......so I made up my own version and now I'm happy to be able to share it with you.........

Supplies:
1 piece exterior fabric (8" x 13")
1 piece unbleached interior fabric (8" x 13") - I used Osnaburg cotton
Velcro (7")
Fabric scraps for embroidery
Water soluble fabric pen
Embroidery floss, needle and hoop
Sewing machine
Scissors
Thread
Iron


The embroidery on these snack bags is what I think makes them fun and unique.  You can use whatever words you like - I used "yummy", "delish", "snack" and "goodies". Take your water soluble pen and write your word onto your fabric (again, I used Osnaburg Cotton).  Embroider over the wording.  Take a damp cloth and remove any of the blue pen that still shows through.

Cut words into rectangle shape.


Take your interior fabric piece and pin velcro in place.  Pin 1/2" from the end and both sides.  I used osnaburg cotton for my interior fabric because I wanted to make sure that I used something that would be unbleached, natural and food-safe.  You can use muslin as well.  I just love the feel of osnaburg (and it's very inexpensive too).


Stitch your velcro in place on both sides.  Stitch as close the edge of the velcro as possible.


Fold your lining (interior) fabric in half (right-sides together).  Stitch down the right and left side, but leave a small opening on one side (see picture below) - 1/2" seam allowance.


I left a small opening on one of the sides - you will need this little opening later to turn things right side out.


Apply fusible interfacing to all of your embroidered words (according to package directions).  Make your words as big or as small as you like.  Mine were all a little different, but I like it this way because it has a more handmade feel.  Iron each word to the exterior fabric.


Use a zig-zag stitch around the exterior of each word rectangle.  You can use a straight stitch if you prefer, but just be aware that you will have some fraying on the edges (but some people like that look).


Fold exterior fabric in half (right sides together) and stitch down the right and left side - 1/2" seam allowance.  Clip corners.  Turn right side out.


Once turned right side out press with an iron.


Turn exterior fabric inside out again.  Place interior fabric inside exterior fabric with velcro facing the right side of the exterior fabric.


Line up the raw edges and pin in place.


Stitch interior and exterior fabrics together by stitching around the top of the snack bag - 1/2" seam allowance.


Now this is why we needed that little opening.  Pull exterior fabric through the opening to turn the whole snack bag right side out.


To close the opening in the lining, stitch down the side of the interior lining.  I stitched the other side too just to make them both the same.


Add top-stitching around the top of the snack bag in coordinating thread.


And there you have it - snack bags for the little ones in your life.  Or just for you (my husband said he even liked them!).


I think it would be fun to embroider kids names on the bags or other fun words that having meaning to your family.


I couldn't decide between "goodies" or "munchies" but Savannah said she liked "goodies" better.


You can adjust the measurements of this tutorial and make these bags as big or as small as you like.


These snack bags came together really quickly by doing them assembly line style.  So I recommend doing it that way if you plan on making these.


 Perfect for dry snack foods like Cheerios!

Cottage Mama's Note:  These snack bags are completely washable, but are not waterproof.  I know oil cloth is a very tempting fabric to use for these bags, but please avoid using that product as it is not considered food-safe.