Monday, October 31, 2011

Tutorial / T-shirt Pillow (just because I found an old t-shirt)


I have been going through my house on and off for the last several months. To get rid of things I usually have a system... There are three piles, such as "Donate", "Sell", "Throw away". Any other place in the house is not hard to do this except in Mr. TRH and my closet.

I have a weakness for fabrics, and there is no exception when I am trying to get rid of some clothes. Even though an item hasn't been worn for such a long time, I start to think "uh, I can use this to make this" or "ah, I bet if I do this and this I can still wear it".

So, this is one of those projects that I just had to try and see. :)

I found this old t-shirt on Mr.TRH’s side of closet. It was in good condition, but he hadn’t worn it AT ALL for several years.


1. First cut it apart.


2. Cut 2 -- 15" X 22" rectangles for the pillow, and many 1" wide strips. If the t-shirt you have is smaller, you can cut smaller rectangles to make a smaller pillow.


3. On one of the rectangles, you can start "drawing". When you stretch the strips, they will curl up; I think this gives an interesting effect to the pillow. I didn't have any plans whatsoever, but I just eye balled the middle, and pinned the first strip and started to sew.


Keep drawing with strips...


4. After I did lots of "drawing" with strips, I made some ruffle strips to fill in some spaces. To make ruffles, sew in the middle of the strips with large stitches and pull one of the threads. Gather the fabric to make ruffles.


5. Put the front and back fabrics right sides together. Pin them and sew all around it with 1/4" seam. Make sure to leave 3" - 4" opening for turning.


7. Snip the corners for a neat finish.


8. Turn, press the edges with an iron. Stuff, slip stitch closed...and ta-da!


When the kids came home from school, Rachel noticed the pillow right away; the boys couldn’t care less about such minor details in life. I thought it was so funny to see the difference. Although, the pillow is loved by everyone, it is so soft and cuddly and perfect for a pillow fight. :)

SURFBOARD SPIRITS


PANDA BEAR "Surfer's Hymn" from m ss ng p eces on Vimeo.


Sunday, October 30, 2011

Windows on Design + A Giveaway

WOD

For the last few months I’ve been working with Taylor Galen to create a window display for Regalo AntiquesDesign Collective Atlanta is sponsoring an event called Windows On Design which pairs showrooms and Designers together to create a one-of-a-kind window display.  Taylor Galen from the Taylor Galen Workroom and I were paired with Regalo for the event.  This year’s theme is “Celebrating Atlanta” and we had such a fun time collaborating and coming up with a theme.  There are six other windows being created by various designers and showrooms and each has a different theme centered around our wonderful city. 

Here is a little sneak peek of our design at Regalo.  I’ll share the rest of the design later this week after it has been revealed in the showroom…

Regalo IMG_2891

Windows on Design opens on November 1, 2001 and runs through November 16, 2011.  It is self-guided and can be spread over the two weeks or easily done in a day.  There is a passport to guide you through each display.  You can pick up your “passport” at any location  I encourage you to get the passport stamped at each location because a drawing will be held and one lucky person will win an Atlanta Staycation.  Your stamped passport will be your ticket to win.  For more info about Windows on Design please Click Here.

------------------------------------------------------------------------------------------------------

GIVEAWAY!!

Taylor and I thought it would be fun to do a giveaway with a little piece of our display.  We are giving away two 18x18 pillow covers that we are using in the display. 

Pillow

pillow1  Pillow2

These pink and citrine trellis pillow covers were custom made by the Taylor Galen Workroom and would be beautiful in a guest room or a little girl’s room. 

You have until midnight on Wednesday,November 16th to enter the giveaway.  We will draw the winner on Friday, November 18th.  

There are a few ways to enter the giveaway.  If you do all 4 you will have 4 times the chance of winning…

1.  Leave a comment on this post. 

2.  Visit Taylor’s Blog and leave a comment on her blog. 

3.  Visit our display at Regalo Antiques and leave your name and email address at the showroom with the manager.

4.  Tweet about our giveaway.

Good luck!

Link Love No.72!

Hello, hello friends, how has your week been? I am still on the path of recovery, but enjoy doing more for my family and of course some sewing now. Where I live, the scenery has changed so much in the past few weeks and I love looking at the beautiful fall colors outside.

There were many fall and Halloween projects and recipes on this week's link party. I enjoyed them a lot, thank you for your participation!

Here are the 5 loves for this week.

I love how pretty and easy it is to make this wreath! Polka Dot Bungalow shared a step by step tutorial on her blog. Great job!


I couldn't resist the cuteness...meet baby princess Leia from Lauren Inspired. Simply irresistible, hands down cute!


First of all, I must say I love unique titles. See Kate Sew shared her "Sweatshirt Liposuction" project with us. At first I thought "What?", then, the picture on her blog post explains it all... funny. The result of this operation is big but "smaller in size" success too!


Our Home's Cool shared this fun scrappy lampshade with us. I love the look of this lampshade, but fell in love with the effect on the sealing when the light is on. Head over to her blog to see what I am talking about.


I have been going through our house to organize for a few months now (on and off). It was pretty easy except for Mr.TRH and my closet. I kept finding clothes that I think I can make it into something and it is just so hard to put them in the "throw away" or "donate" bag. Anyways...Orlosubito did such a wonderful job turning a man's shirt into a pretty tunic. I love the simplicity of it. Thank you for sharing!


See you at the next post everyone!

Thursday, October 27, 2011

Shutterfly Holday Cards Giveaway!


I am doing a giveaways (3 prizes!) for Shutterfly today. Go here to find out more details about the exciting giveaway!

Halloween Costumes ~ Princess Witch and Princess Ballerina

Every year I have made my kids Halloween costumes.  It's something I looked forward to ever since Savannah was born.  I have some of the best memories of the costumes my mom used to create for my brother and I.  I loved those costumes and always felt really special wearing them to school and showing them off to my friends.  There's nothing quite like handmade.  I know they only wear the costume for a day, but those memories will last forever.  Trust me, I still remember being Daisy Duck, a clown, a bird, a bunny rabbit, ect. 

It took my girls a little while to decide exactly what they wanted to be for Halloween.  They started out both wanting to be witches, then they wanted to be hummingbirds, then some sort of insect........but they eventually made their final decision ~ a princess witch and a princess ballerina.  I was pretty surprised that Matilda chose a different costume than her sister, but pleased that she seems to be developing her own sense of self.

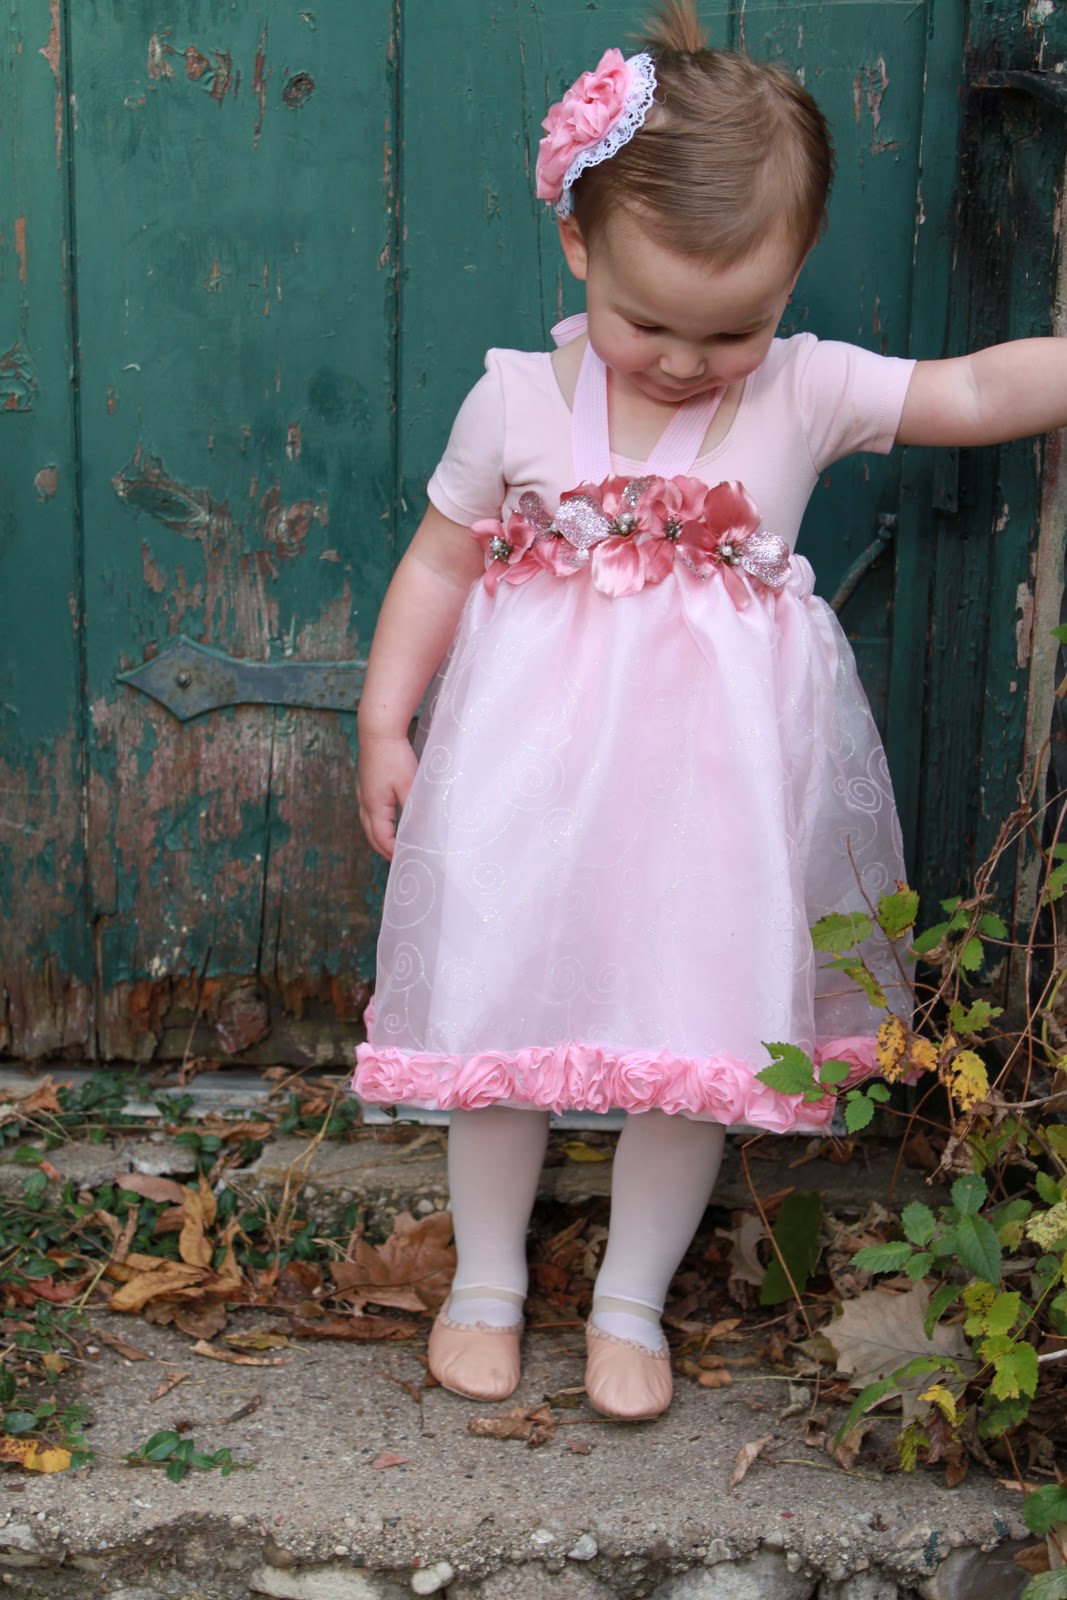
I wasn't exactly sure what these costumes were going to end up looking like, but I figured they couldn't be too tough.  So here is the finished product..........


I didn't use a pattern for either of these dresses.  I went to Joann Fabrics and let the fabrics just kind of guide the way.  I do that a lot.  I go into a store having no idea how something is going to turn out, but once I start pairing fabrics together a vision starts to form.


Miss Matilda loves her princess ballerina costume.  When I finished the look, I tried it on her to make sure it fit and she danced and twirled around for about an hour.  I think she might be my little ballerina, but only time will tell.


This dress was incredibly quick and easy to make.  I simply measured Matilda's chest and measured from under her arm down to where I wanted the dress to fall.  Then I added and inch on the top and bottom to allow for hemming.  I cut a piece of elastic 1" smaller than her chest measurement for the top of the dress and added a ribbon to act like a halter top.


The flower detail in the front of the dress was all stitched after the elastic had been threaded.  These were flowers that I found on a long branch at Michael's craft store.  I simply cut them off of the branch and arranged them on the front of the dress.


The head piece has a backing made of felt and the flower trim and lace is hot glued to the felt.  There is a clip through the felt to hold the head piece in place.


One of my favorite aspects of this dress is the flower trim around the bottom hem.  This is something I happened to already have and I think it adds a nice weight to the dress and makes it really fun and special.  The entire dress is lined because the outer, sparkle fabric is pretty rough on the skin.  Plus I didn't want the dress to be too see-through.


My little sweetheart keeps saying, "Thank you, mama, thank you!" about her special costume.  She makes all the time and effort that goes into creating an outfit well worth it!


The princess witch costume was really fun to create!  It took a little more time than the princess ballerina but that was because there was more detail involved.


The princess witch costume is a double layered skirt with a solid cotton bottom layer and a spider-web top layer.  The top layer is somewhat stiff so it adds a nice volume to the bottom of the dress.  The bodice has a corset-style detail and ties with black satin ribbons on each shoulder. 


I used a large artificial flower I found a Michael's craft store for the detail at the waist and on the hat.  I cut all the petals apart on the flower and placed them how I wanted them.  It's amazing how far one giant flower will go and I still had some petals left over.  The dress is completed with the plaid ribbon around the waist and the coordinating bow on the hat.

 
I can't believe how old my 3.5 year old princess witch is getting.  It's hard to believe that is my little baby in the picture above.  Time really does fly by!  

I am really looking forward to seeing my two princesses in their costumes going door-to-door trick or treating on Halloween night.  I think they are going to have SO much fun together this year.  

Hope you have a super Happy Halloween!