Showing posts with label Decorating. Show all posts

Monday, November 5, 2012

Mason Jar Soap Dispenser ~ Tutorial


I have a thing for mason jars. Big, small, new, old........but the ones that really grab my heart are the blue jars. I have quite the collection these days. Some of them I got from my Grandma Peggy and some of them I have picked up here and there from garage sales, flea markets and thrift stores. The blue glass is just so pretty and soothing......I absolutely love them!

I have been wanting to turn several of the old blue jars into soap dispensers for about the last two years. I've seen some mason jar soap dispensers for sale and always thought they would go so perfectly with our cottage-style home. A couple months ago I finally mentioned my interest in this project to my husband thinking I could have him help me by drilling the hole in the top of the lids. But sometimes, I just get so impatient that I decided to take things into my own hands. A girl's got to do what a girl's got to do, you know?

So, with that being said, there is probably a more correct way to do this project if you really know how to use a drill and a metal drill bit, but if you would prefer to just use basic tools, this tutorial is for you! Plus it will only take you 10 - 20 minutes.

Mason Jar Soap Dispenser
by Lindsay Wilkes from The Cottage Mama

Supplies:
1 blue mason jar and metal lid
1 soap dispenser top
Phillips head screw driver
Needle nose pliers
Safety glasses (optional)
Scissors
Sharpie or other marker

Instructions:


Mark a hole with a sharpie in the center of the metal lid where you would like to put your soap dispenser.


The inside of the old metal lids have a ceramic lining inside. You need to remove this in order to make the hole for the soap dispenser. To remove the ceramic insert, just pound on it really hard with your screwdriver until it cracks. Once it cracks, the pieces come out really easily.

During this step I would recommend wearing safety glasses because the little ceramic pieces can fly up in the air and get into your eyes. But again, that is totally optional. Rinse out the inside of the lid once you have removed the ceramic pieces.


Now this next step is a little wild. You are going to take your screw driver and pound down on the little black mark that you made in the first step. I pounded about 4-6 times and then pushed down with all my might. You could also be a little less crazy and just take a hammer and hammer down on top of the screw driver to drive it through the center of the lid.


In the picture above, you can see how nicely the screwdriver will go through the top of the lid.


As you can see, the hole that was made from the screwdriver is not big enough to accomodate my soap dispenser, so I needed to make it larger. This soap dispenser top was from another store-bought hand soap bottle that we already had in the house. You could buy a fancier one or buy a plastic one at your local craft store.

If you are using a top from a bottle you already have, just make sure to pump out the soap and wash it out really well with warm water.


To make the hole in the metal lid larger, take your pliers and peel back the metal. This step is surprisingly easy. Just pull back the metal and check and see if your soap dispenser will fit. You want the fit to be very tight so that the top does not move around, so make sure you don't pull back too much metal before testing the fit.

This step could also be done with a drill and a metal drill bit, but again, you want the fit to be very tight so make sure you don't use a bit that is larger than the soap dispenser.


Fit your soap dispenser into the metal lid. Again, I can't say it enough, but you really want to have to work the soap dispenser into the lid so it's really tight. Since we pounded so much on the lid, you may just need to pop the top of the lid back out a little bit.


Now you need to cut the plastic tube from the soap dispenser to fit your jar. Use the scissors and cut it to size. It should be close to the bottom of the jar, but not touching.


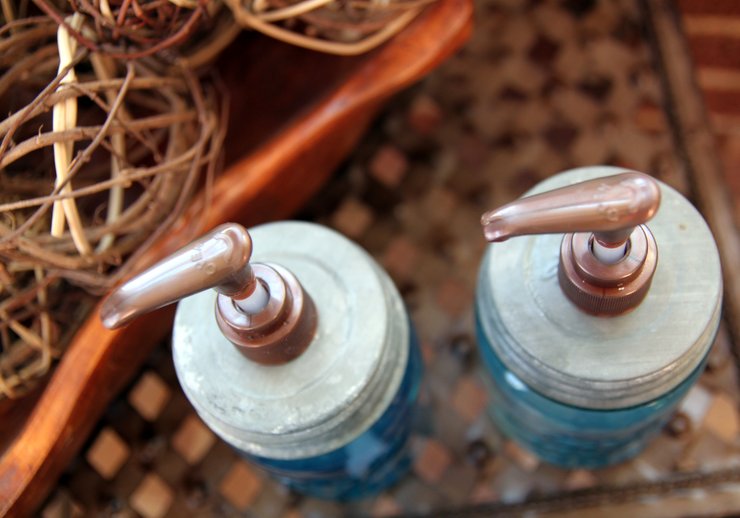

Fill the jar with your favorite hand soap, put the lid on top and enjoy!


These mason jar soap dispensers would make lovely gifts for the holidays or as a housewarming gift. I made these two in about 20 minutes, so it is a very quick and easy project. Plus it's kind of fun to get out the tools!

Cottage Mama's Note: You could probably do this project with a regular store-bought mason jar, but you would need to make sure you attached the center lid insert to the outer ring really well. Also, I'm not sure how easy that metal is to poke through with your screw driver (the old metal was pretty easy), but if that's what you have, then give it a try!


Wednesday, August 15, 2012

Easy $1.00 Mirror Makeover


There are so many decorating projects I would love to tackle around our house, but there just isn't a lot of time (or extra money) to get those done.  So many of the projects will have to wait, but I figure I can do a little something here and there to make myself feel a little better in our home.


We have had this mirror since before we even moved into this house.  I absolutely love the shape of it, but it really doesn't pop on our beige family room wall.  When my mom was visiting I was telling her how I wanted to do 'this and that' to our family room like bringing in some blue into our palette of beige, sage and cranberry.  I recently changed out the curtains, which have some blue in them and my mom suggested that I paint the mirror to bring out the blue from the curtains.


I head to our local Joann's a picked up a small tube of Martha Stewart Craft Paint in a Satin finish.  I thought about spray painting the mirror, but I really couldn't find anything that was just the right color.  When I saw Martha Stewart had a color called 'Blueberry', I knew that would be just right.  This paint is usually $1.99 at my Joann's, but I had a coupon, so it was only .99 cents!


I taped off the interior of the mirror with painters tape.  Got out our art brushes and began painting.  I'm kind of glad I decided to paint the mirror rather than spraying it.  I had forgotten how soothing painting can be and I thoroughly enjoyed the whole process.  It took me about 1 hour to paint the mirror and I let it dry overnight.  I thought the craft paint covered surprisingly well.  I wasn't quite sure how it would do since I didn't prime the mirror at all.  The next day, after the paint was dry, I removed the painter's tape and hung the mirror on the wall.


The mirror seems to have a new life again.  A once nice, somewhat drab mirror, now pops off the wall in this deep blueberry tone.  The great thing about working with timeless shapes is that you can always incorporate them into your decor.  In our next house, the blue might not work, but then I can just paint it again!  And for .99 cents, that is no problem!

This mirror makes me (and my wallet) really happy because my favorite kind of makeovers are the ones where you take something you already own and make it new again.  

Hmmmm......what can I paint next?  

Friday, February 17, 2012

Inexpensive Wall Art ~ Decorating with Paper


I love when I find a great print that can bring an entire room together.  Usually I'm looking for it in the form of fabric, but when I can't find exactly what I want, sometimes I have to turn to other sources ~ like paper.


Several months back I was shopping at my local Home Goods store and as I was going to check out this fabulous wrapping paper caught my eye.  You know how much I love patterned fabric so it was no surprise that I was drawn into this bold wrapping paper.  I needed some wrapping paper for a wedding shower gift, so I picked it up and it said $3.99 and I said 'sold!'.  Well, I wasn't even paying much attention, but when I got it home I noticed that is was Vera Bradley wrapping paper.  No wonder I liked it, I love her designs!


I used this wrapping paper to wrap of the wedding shower gift and then had quite a bit leftover.  I noticed that it actually picked up quite a few different colors that I have going on around our house, especially in the family room.  So I pulled two frames off the wall that were needing an update, cut the wrapping paper to size and framed them. 

Instant wall art ~ how great is that?  And inexpensive, to boot!


Here is a little corner of our family room with the two framed pieces of wrapping paper.  In addition to wrapping paper, think about framing fabric, wall paper or sheet music as well.  It's an easy update that can really bring a room together.  And if you get tired of it, no biggie, just change it out and move on to something new that you love.


Above is a picture of our bedroom, where I simply framed two squares of fabric to tie the room together.  Another easy, inexpensive wall art project.  Definitely a great bang for your buck!

Tuesday, September 20, 2011

Fall Fabric Pumpkin Tutorial

Since I am taking some time off to enjoy our new baby boy, I thought I would re-post one of my favorite fall tutorials from last year.  I know a bunch of you are new to the blog (thanks so much for joining us), so you might have missed this one.  This is a really easy and inexpensive fall project, but I just love the end result!


It's really starting to feel like fall here in the Midwest.  We still have our occasional warm day, but for the most part fall is upon us.  Fall is my favorite time of year with all the fun festivals, pumpkin patches, apple orchards.......I truly value the beautiful seasons each year.

Since it finally feels like fall, I think it's time to get out some decorations for around the house.  I wanted to make something for our home that tied in with the season as well as our decor.  Though I tend to use bright colors in my clothing design, my home is decorated in more rich tones....think deep red, green, mahogany and cherry wood.  I came up with these chubby fabric pumpkins and can't wait to put them around the house.  I thought you might like to make some too.........so here's the "how to":

Fabric Pumpkin Tutorial

Supplies:
Fabric pieces - variety of sizes
2 pieces of brown felt
1 piece tan felt
Fiberfill or other stuffing material
Brown embroidery floss
Thick twine
Hand-sewing needle
Sewing Machine
Decorative wire berries (optional)

Directions:


Gather your fabric.  I found these upholstery fabric samples at Joann's for $2.00 a piece.  They were discontinued special order fabrics.  I decided to use decorator fabric because I love the variation in textures and designs, but you could definitely used quilting cotton for this project if you would prefer.


Cut your fabric.  I wanted my pumpkins to be all different sizes since no two pumpkins are ever the same.  Here are some of the measurements I used:
17.5" x 10"
17.5" x 12"
12" x 6"
12.5" x 7.5"
17" x 13"
Basically you are looking to cut out a rectangle shape.


Fold your rectangle, right-sides together.  Stitch down the long-side (side to the right) with a regular straight-stitch.  Then run a gathering stitch around the top and the bottom (leaving the top and bottom OPEN).  Turn right-side out.


Pull the bobbin thread to start gathering one of the ends.  Work the gather until you have pulled it as closed as possible.  If you are using regular cotton this will be much easier.  If you are using decorator fabrics, this can take some time.  You may also consider hand-sewing a large straight stitch with embroidery floss and using that to gather instead of your machine (my thread broke on one of my pumpkins).  Either way will work. 


This is as tight as I could pull my bobbin thread with the upholstery fabric.  Tie your thread ends together and turn it in-side out again.


Place the gathered end in your sewing machine and stitch to close.  You will have to kind of jam the fabric under the foot as it is very thick, but don't worry, your machine can handle it.  You may also choose to hand-sew the opening closed with embroidery floss.


Next fill your pumpkin with fiberfill or whatever type of stuffing you have on hand.


Once you have stuffed your pumpkin, pull the bobbin thread from your other gathering stitch to begin to close the opening.


Close the opening entirely by hand-sewing.


Take your twine and wrap it around the pumpkin (very tightly).  Do this as if you were wrapping a present.  Loop it around, then cross-over, around and cross-over.  You will cross-over at the top and bottom of the pumpkin.  Go back and forth until you have 6-8 sections on each pumpkin.  Finish by simply tying in a knot.

You may need to slide the twine around until you have even look sections - just work it until you like the look.

Next you will need to make your stems and leaves.  I made each stem a different size, so just cut out whatever shape you like from your brown felt.  I also machine stitched on top of the felt to add some texture.  Place both stem pieces together (right-sides together) and stitch around the curve (leave the straight-side open).  Turn right-side out.


Suff your stem with fiberfill.


Cut out two to three leaves per pumpkin.  I did mostly brown leaves and a couple tan ones.  Again, I machine stitched veins onto the brown felt with brown thread.  This is your opportunity to be creative......cut your leaves out in any shape or size that you like.  Mine were all different.


Next hand-sew your stem and leaves to the top of each pumpkin.  There is no special technique here.  Just place the leaves where you like and stitch away.


You can certainly skip the stitching on the stem and the leaves, but I think it adds a more realistic feel to the pumpkins.


For a final finishing touch, I took a bunch of deep red and green berries and added them to the top of each pumpkin.  This was just one bunch that I purchased at Joann's.  I cut the bunch apart and wrapped two wire pieces around each stem.  To make the curls, wrap the wire around a pen or pencil.


On a couple of the tan leaves, I hand embroidered some detail.  I like the contrast between the tan leaves and the brown ones.  You could hand-embroider all of the leaves or machine-stitch all of them......again, it's up to you.


And there you have it - a family of festive fall fabric pumpkins!


They are just so cute, don't you think?  I could just squeeze them!  Well, I won't, but my daughter Savannah already did......she gave each one a hug and said, "I love you pumpkins!".

Happy Fall!