Friday, February 26, 2010

Challenge Dress Giveaway Winner!

And the winner is "Savvy Saving Momma" who won with comment number 33 where she said;

"I follow your blog"

She also said in her previous comment, "I enjoy your crafting and sewing blogs! If I won I would love to get the Matilda Tutu dress!

So here it is, The Matilda Tutu Dress:


Savvy Saving Momma, I emailed you to your blogger account email, so hopefully you have received that so we can discuss where you would like me to ship this cutie patootie little dress.

Thanks so much to all of you who entered!  This was so fun, I will definitely do another giveaway soon!!

Happy Friday!

loving…

1.  this ikat rug from william-sonoma home.  so pretty.

img93m img22m

2.  this cool wood-grain tool.  now you can i can faux bois whatever my little heart desires.  i saw this tool here and you can purchase it here.

419tHQLFuFL__SS500_ 3.  this blog called isabella & max rooms.  i stumbled across it earlier this week and can’t get enough.  there are wonderful pictures and plenty of great diy tips.  i’m loving her ongoing tutorial on how to make window treatment panels.  if only i had a sewing machine.  in my guest room i’ve been making my own but i’ve been cheating and using the no sew method.

Capture

4.  this mushroom wreath, new at crate and barrel. 

Capture25.  this playful hopscotch rug from cb2.  how cute would this be in a kid’s room.

Capture3 Capture4

i’ve been in houston all week installing a model home.  it was a fun time but i’m ready to get home.  i’m heading home this morning and looking forward to the weekend and seeing my best friend.  she’s coming into town for a visit.  i’ve got a lot to do before she comes though.  hopefully my plane doesn’t get delayed. 

have a great one!

Thursday, February 25, 2010

No-Sew Projects with Fabric

Now I know the majority of you that read my blog are sewers; however, I do know there are some that are not.  As you can see from my previous post, I LOVE fabric!  I think it is so gorgeous and just looking at it gets my creativity going.  But did you know there are plenty of ways to incorporate fabric into your home that does NOT involve sewing?

I thought I would show you a few no-sew fabric projects that I have around my home:

These are basic square frames purchased from IKEA.  I simply framed some fabric that I really loved that seemed to coordinate with our store-bought bedding.  Personally, I think it really adds a lot to the room and gives it a completed look.

Here is the framed fabric hanging over our bed.  And do you see the accent pillow on the bed?  Yes, that was done in my days before I had my sewing machine.  I made that using heat-bond and just ironed it all together!

This is the wall-art that hangs over my 7-month old daughter, Matilda's crib.  I purchased an inexpensive painters canvas from Michaels and covered it with fabric (I staple gunned it to the back of the canvas).  I then painted a wooden "M" pink and covered it with pretty floral wall-paper accents (found at Joann's).  I added a pink ribbon on the top and stapled it to the top of the canvas (and hid the staples with the upper flower......shhhhh....don't tell).

This was another way I incorporated fabric into my daughters room without sewing.  I covered a foam board with batting and then covered it with fabric (securing with straight pins on the back).  I added ribbons across the front and secured them in place with pearl straight pins (found in the sewing notions section of Joann's).  I added a hanging ribbon on top (secured by straight pins) and hung it on the wall.


Here are three pieces of wall art I created using fabric for my daughter Savannah's "big girl room".  I've shown these to you in a previous post (see here), but I don't know if you realized there was no sewing involved.  I simply covered the mats that came with the frames in polka dot fabric.  Then I deconstructed the animal templates and used different fabrics to rebuild the look of the animals.  All of the animals have a pearl as their eye (found in the scrapbooking section of Hobby Lobby).

Finally, this was one of the easiest no-sew projects.  This was a bookcase we purchased from IKEA to use in my daughters bedroom.  It came with a "not so lovely" cardboard backing to the shelves.  So, I decided to cover this with fabric before we put it together.  This is secured using duct tape on the back-side of the cardboard - gotta love that stuff!!

So as you can see, there are many different creative things you can do with fabric if you don't sew.  I always encourage my friends and family to start sewing if you have any interest in it - it's really not as hard as you think.  But if you don't have the interest or the time, you can still have fun with all the beautiful designer fabric that is on the market today!

Cottage Mama's Note:  If you have any questions about these projects I have described, feel free to leave me a comment or email me and I would be happy to go into further detail.

Now Don't Be Jealous......

.........but look what arrived in the mail for me yesterday!

Eeeeek - it's my fabric!!  I had ordered about 40-50 yards of fabric awhile back and it is finally here.  I will be using most of this yardage for items in my etsy shop.  I do have several item for my shop ready to go, I just need to get some good sunshine to take my pictures so I can list them.

I have had a lot of friends ask me where I get my fabric.  Well, I usually can find the best prices for fabric online.  The only thing about ordering online is you usually have to wait for it and you don't get to touch and feel it.  However, if you are familiar with a designer, then you usually will know what to expect.  I love looking in fabric stores, so sometimes it is best to browse your local specialty fabric store to see what the fabric looks like in person.  Many times the color of a fabric can vary online depending on your computer monitor color settings.  So if you plan to order a lot - check it out in person first!

The majority of the fabric I ordered is the new "Nicey Jane" by Heather Bailey (I love the fresh, clean look), with a little "Love" by Amy Butler (Gorgeous!), and a few yards of Sandi Henderson.  These designers are not found in your big-box fabric stores like Joann's or Hancock, so if you are looking for them in-person, best to check out the specialty stores.

Here are these three designers websites if you would like to check out their lines of fabric:

Heather Bailey 


Amy Butler 


Sandi Henderson

I want to start sewing right now!!  But, my daughters 2nd birthday is next week and we are having an "Elmo Dance Party" so I better finish up things for her party first.  Hope you are all having a great day!

one kings lane and a special offer just for you

logo_hdr09bmost of you who frequent the blog world have probably heard of one kings lane before.  we’ve mentioned them quite a few times because they are pretty awesome.  if you haven’t come across “okl” on a blog or found them some other way then you really should go and check them out.  onekingslane.com is like a private shopping club and they sell some of the best home products on their site at amazingly discounted prices.  here’s the trick though the quantities are limited and you only have a short window to buy them in, like say…72 hours.  if you are a member of okl then you get an email each day notifying you of the great sales events that will be going on that day.  their website also shows the current and future events going on so that you don’t have to wait for that email to come in.

Jan2010_dogs_revone kings lane was founded by susan feldman and alison gelb pincus, two home enthusiasts that decided they wanted a to figure out a way to offer home decor and accents to the public at an affordable cost.  at the atlanta market i was fortunate enough to meet susan.  not only is she beautiful, but she was so sweet as well.  after talking with her about my blog she connected me with alison.  alison through out some ideas of how to bring a little piece of one kings lane to you guys.  we decided that instead of having a giveaway with one gift we would have a giveaway for everyone!!!! 

here’s the deal.  anyone who signs up to be a member of one kings lane on the charmhome sign-up page will receive a $10 credit.  as long as you sign up by march 10th on my sign-up page (click here to get to my sign-up page) you can use that credit to shop for any of the items on the okl site.  the $10 credit will expire on march 31st so you have to use it up fast. 

these are just a few of the great items out there on one kings lane right now.

archipelago candles

ARC01313_81361

bliss studio pillows

bliss pillow bliss pillow2

hillary thomas bedding


HLT01251_73110 HLT01250_73108

HLT01253_73106 bailey street tables

bailey st1 bailey st

culinhome cutlery

CUL01235_92873 simrin table linens

SMR01264_31647 SMR01275_31658

SMR01234_31610

there’s much more to check out so if you haven’t signed up before hurry and sign up so that you can get your $10 credit and start shopping.

CLICK HERE to be taken to my sign-up page. 

HAPPY SHOPPING!!!

Wednesday, February 24, 2010

Tulips & Toile


Tulips were on sale yesterday.


After several days of blue bird skies and cozy sunshine, we're having some rainy days. The tulips bring some brightness to these grey days. I love the white against the robin's egg blue walls (Opal Essence by Benjamin Moore).


I haven't put fresh flowers in here (our downstairs bathroom) for awhile, although that's exactly what the table is for.


I'm still loving my toile shower curtains from Pottery Barn.


Today I also hung a piece of art I recently framed. I found the nude drawing at an antique show several weeks ago. Shortly thereafter, I found the Victorian frame for $35. I think they go quite beautifully together. I just love the combination of the formal ornate detail of the frame, paired with the lovely simplicity of the charcoal drawing. I also love the gold hue against the blue walls.


Did I mention that tulips were on sale yesterday? I bought some pink ones too. They're a french variety that look like sweet little peonies.

I was surprised when the florist told me that if I wanted the tulips to last longer, to not trim the stems when I got home. She said that when you cut them, they release an acidic substance (that gooey stuff) into the water that makes the blossoms deteriorate faster. Has anyone ever heard of that? Well, I thought I'd try it. I didn't cut any of them, just plopped them in their vases 'as is' (which felt a bit neglectful).

I'll keep you posted on how long they last.

UPDATE: Go here to read that the above information on tulips is completely false!

Tutorial~Tunic Dress for a Little Girl~


I found a purplish-plum color t-shirt at the sales rack in Target the other day, it was $2. I went through my fabric stash, and picked this fabric to make a tunic dress. Well, I wanted to make a dress, but the fabric I had wasn't a whole lot. I thought she could wear this with tights or with pants.

I worked on this tutorial over that last few weeks while I worked on other projects. I thought I took more pictures to explain things better, but I didn't. If there are some areas that you have a hard time understanding, I am sorry. If you need to see how to made the ruffles, please go here, to see the instructions. That might help a little.

{You will need}


One T-shirt

Fabric(if you have 3/4 yd, you should have enough to make this)

Matching Thread(Because the t-shirt and the fabric are such contrasting colors, I had to use two diffrent color threads. If you don't want to do that, I advise you to pick a top and fabric that are somewhat similar.)

{How To}

~The Top~

1. From the fabric cut a 2 1/2" Wide X 44" Long strip. Cut it to three equal pieces and fold the strips right sides together in half and sew using 1/4" seam allowance.

2. Turn the strips inside out. Fold the strips so that the seam will come to the one side and press with an iron. Also, fold in both ends and press.


3. Using the largest setting on your sewing machine, make a ruffle. Sew the ruffle onto the middle of the T-shirt.
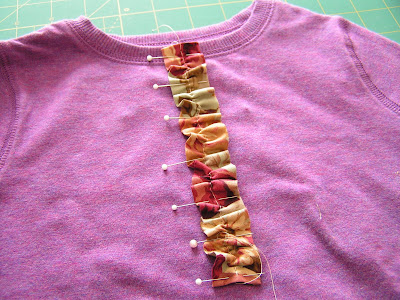

4. Repeat the process and add more rulles on both sides(Mine are 1 1/2" a part).


5. Cut 2 1/2" off from bottom of the T-shirt.(or more, if you would prefer a higher waist)


6. From the T-shirt strips, cut two 3/4" X 12 1/2" strips. (Save the rest if you want to make a hair accessory later).


7. Make ruffles and sew them on between the fabric ruffles.


~Skirt~

1. Cut one 5" by the wideth of the fabric strip, cut in half to make it into two pieces. (These will be the top portion of the skirt). Then, cut two pieces of 6" X 36" strips. (These will be the bottom portion of the skirt).

Do zig-zag or use a serger to finish both sides of the strips. With the right sides together, sew both sides and make a big loop.

2. Start with bottom skirt, with the largest setting, sew two lines all around. Pull both threads to gather the fabric. Spread the gather evenly for better results. Gather the fabric to fit the width of the top skirt.


3. Attach the top and the bottom skirt. Pin them together first, and make sure the side seams match up, then sew. After you have attached them, turn the fabric inside out and press the seam. Using 1/8" seam sew on the right side of the fabric.


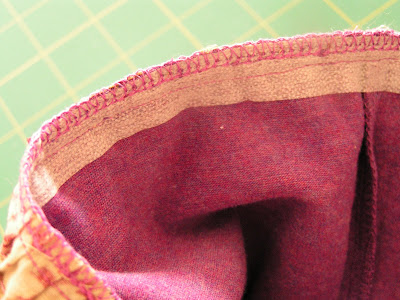
4. Repeat the process for the top edge of the skirt, then attach it to the shirt. Since I still haven't practiced using my serger (shame on me!), I ironed 1/2" wide strips of interfacing on the wrong side of the t-shirt to prevent it from getting wavy.

~Finish~

After sewing the top and the skirt, turn the dress inside out and sew right side of the t-shirt usign 1/8" seam.


For the hem, I just did a narrow hem since I did't have that much fabric to work with. To do a narrow hem, fold the raw edge 1/4" twice then sew. It is a rather casual look, but I thought it would be ok.

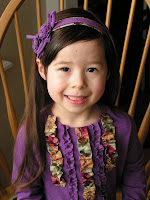
I used leftover pieces and made a matching headband. It is all done, all you need to do is to let your loved one enjoy it.


That's what I did...