Showing posts with label Quilting. Show all posts

Saturday, November 17, 2012

Modern Designs for Classic Quilts ~Book Review & Giveaway


Today I am very excited to introduce a brand new quilting book that you are sure to want to add to your Christmas wishlist. Modern Designs for Classic Quilts is written by Kelly Biscopink and Andrea Johnson and is complete quilting eye candy. I met Kelly as an Editor through my publisher and was absolutely thrilled when I found out she had written a book of her own!

At quilt market in Houston, TX last month, my mom (aka Grandma Jane) and I went out dinner with Kelly and Andrea and we. had. a. ball. We laughed so hard we cried. I'm telling you, these are my kind of girls. So I'm going to try hard to write an un-biased review, but it always helps to know that the authors behind a book are truly wonderful people. And it helps when they've written a truly fabulous book!


I absolutely adore the concept of this book as I feel it is very similar to how I view sewing children's clothing. The book has some of the most traditional, classic quilt styles, yet they are taken to a whole new level through the use of modern patterned fabrics and bold solids.

This Spider Web Quilt, called Effie's Web, might be my favorite in the book. I love how much color and movement you can see throughout the quilt. Look at it one way and you see one thing, look at it another and you see something else. Also, it's a great way to use up scraps of fabric and with all the clothing I sew, you know I have a lot of scraps.


Although, I love Effie's Web, it's a pretty close call between that one and the cover quilt called the Urban Cabin. First of all, how cute is that name? It is a traditional log cabin style quilt, but the way in which the fabrics are placed is so totally modern. Brilliant!


Check out some of these quilt patterns included in the book that use beautiful solids incorporated into their designs. As much as I love patterned quilting cotton, sometimes I think solids can bring the beauty out in a quilt design like nothing else.


The overall tone of Modern Designs for Classic Quilts is very friendly and welcoming, just like Kelly and Andrea. The techniques section is beautiful with very clear photographed instructions. They include everything from cutting, sewing and pressing to how to match seams, sewing curved seams and paper piecing. There are also non-quilting techniques included such as installing a zipper, ruffling and raw edge applique that are used for some of the smaller projects included in the book.

Kelly and Andrea have done such a wonderful job bringing together two worlds of quilting together in one book; modern and traditional. Who says you have to be defined as a modern quilter or a traditional quilter? No one. And these ladies show that you can have it all......a little modern, a little classic and a whole lot of beautiful.

So guess what? Not only did Kelly and Andrea send me my very own copy of this book for this review, they sent a copy for one of you! 

Would you like to win a copy of Modern Designs for Classic Quilts?

Well, this one is easy, just leave a comment on this post telling us why you would like this book. 
One entry per person. Giveaway will be open until Monday, November 19, 2012 at midnight (CST).

To check out more reviews of Modern Designs for Classic Quilts, please visit some of these other wonderful blogs on the book tour:

Tuesday, Nov. 6             (Lindsay, CraftBuds)
Wed., Nov. 7                 (Jill, Darling Jill Quilts)
Thursday, Nov. 8           (Faith, Fresh Lemons)
Friday, Nov. 9               (Generation Q)
Saturday, Nov. 10         (Angela, Quilting is my Therapy)
Sunday, Nov. 11            (Shannon, Stitch Craft Create)
Monday, Nov. 12           (Laurie, Scarlet Fig)
Tuesday, Nov. 13          (Kaysie, KZJo’s Studio)  
Wed., Nov. 14               (Jessica, A Little Gray)
Thursday, Nov. 15         (Mary, The Tulip Patch)
Friday, Nov. 16             (Deborah, Whipstitch)
Saturday, Nov. 17         (Lindsay, The Cottage Mama)
Sunday, Nov. 18           (Jenny, Sew Kind of Wonderful)
Monday, Nov. 19          (Carla, LollyQuiltz)
Tuesday, Nov. 20         (Thomas, Thomas Knauer Sews)
Wed., Nov. 21              (Brenda, Pink Castle Fabrics)
Thursday, Nov. 22        (Lindsay & Liz Rea, CraftBuds, Inspire Me Grey)
Friday, Nov. 23             (Sarah, The Last Piece)
Saturday, Nov. 24         (Cara: Cara Quilts, Andie: AndieJohnsonSews, Kelly: Stitchy Quilt Stuff)


Also, you can keep up to date with these lovely ladies over on their blogs: 
Kelly at Stitchy Quilt Stuff and Andrea at Andie Johnson Sews.

Tuesday, October 23, 2012

Easy Eye Glass {or Rotary Cutter} Case Tutorial


Today we have a special guest, my mom (aka Grandma Jane) with another one of her quick and easy quilting tutorials. Take it away Mom........

I would really encourage any new quilter to find some sort of quilting group to join. It is a great way to learn from and be inspired by more experienced quilters, share quilting projects, get advice and support, and most of all, to make new friends who are as crazy as you are about quilting! There are a lot of online quilting resources out there (after all, you are reading this blog) but a group that you can physically be part of is a gift if you can find one. Most areas have quilting guilds that you can join, quilt shops may have classes and open sew times, or just gather a few of your friends together to sew up a storm.


Early morning Camp Allen and a porch just made for quiet reflection….

I returned recently from a weekend quilting retreat with a group of wonderful women! Our weekend retreat at Camp Allen north of Houston was filled with lots of sewing, sharing good food, plenty of laughter, personal reflection, prayer and fellowship. There were twenty women of all ages ranging from a 16-year old granddaughter of one of the members to a great-grandmother with 25 grandchildren and everything in between. I can’t tell you all the “details” of our weekend because what happens at Camp Allen….stays at Camp Allen… but I will say just say lots of new quilting tattoos went home. Shhhh….

I started quilting about two years ago when I was invited by my friend, Diane, to join the church quilt ministry group. The group meets several times a week with evening and daytime meetings to accommodate schedules for everyone with the focus on ministry projects for the church. These women make quilts for each baby dedicated at church, prayer blankets for hospitalized church members and recently sent 58 (yes, I said 58!) jelly roll strip quilts to missionaries in Guatemala. Margaret and Barbara, the leaders of the group, are an inspiration in many ways. Not only do they have awesome quilting skills but they are women of incredible strength and faith.

The service project that everyone worked on during our weekend, in addition to their own sewing, was a cute little glass case. The goal is to make 90 of these cases to be included in goodie bags for the breast cancer survivors being honored at a gala in March at a local hospital. October is National Breast Cancer Awareness Month so how fitting to be working on this project at our retreat. This is a really easy project that would be a great gift idea/stocking stuffer for Christmas, too. If you don’t need it for glasses—it makes a perfect holder for a rotary cutter for your favorite quilter!

This project is inspired by the Quilts and More Magazine project in the Summer 2012 issue. 

Easy Eye Glass {or Rotary Cutter} Case Tutorial
by Grandma Jane for The Cottage Mama


SUPPLIES:
(1) 9 inch square of batting
(1) 7 ½ inch square of outer fabric
(1) 7 ½ inch square of lining fabric—flannel works well
(1) 1 ¾ x 9 inch strip for strap

INSTRUCTIONS:


1. Center outer fabric on batting and quilt as desired. I used a cross-hatch design that I marked with a fabric pen prior to sewing. Trim batting even with fabric.


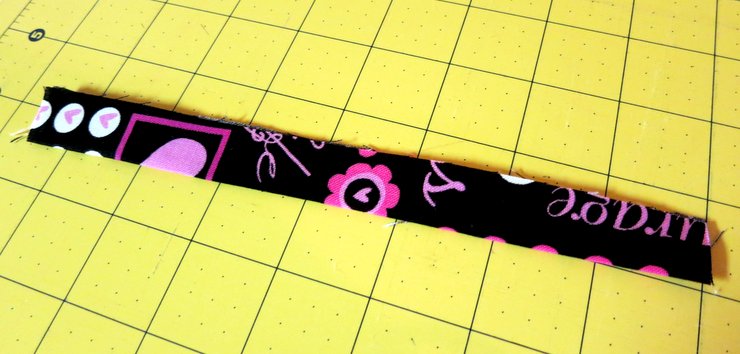
2. Fold strap piece in half lengthwise and press. Unfold and fold in long edges to meet in the middle. Refold in half along pressed edge and edge-stitch.


3. Fold stitched strap in half cross wise. Pin to top edge of outer fabric ½ inch from left edge. Baste. If your fabric is directional—make sure to have it going the direction you want at this point.


4. Place lining fabric on top—right sides together and stitch ¼ inch seam across top, catching in strap.


5. Press open with seam allowance towards lining and edge stitch lining.


6. Fold edges together lengthwise and stitch a ¼ seam around outer edge, leaving short-end of lining open. Clip corners.


7. Turn case right side out. Turn in short edges of lining ¼ inch and press. Hand stitch or machine sew short end of lining. 8. Insert lining into case and press again! Easy!!!


Thanks so much for joining us today, Mom! It always so fun to have you here.  I definitely think these will be on my easy gift giving project list for this year!

Monday, September 17, 2012

Charm Jelly Roll Friendship Quilt Tutorial & Simply Color Giveaway

My mom, Grandma Jane, is back with another one of her wonderful quilting tutorials and a fabulous giveaway of V & Co's new line for Moda 'Simply Color'. Take it away Mom.....

 
I don’t like goodbyes and I had a tough one a few weeks ago when I had to say goodbye to a dear friend and co-worker who moved. Lori and I had worked side by side for almost 12 years and she was a part of my day to day work life in a big way! We worked so closely together on projects through the years that we were almost like an old married couple who begins to finish each other’s thoughts and sentences. Crazy, I know but it was a comforting feeling to work with someone who I knew so well!

Besides being incredibly smart and talented in the work setting, Lori is a woman of great personal strength, faith and integrity. She always made me laugh, (many times to the point of tears), with her stories about her family and kids. We shared lots of sad tears too, as we both have lost our precious mothers in recent years. She knew immediately what I was feeling when I said I missed my mother and she could say just what I needed to hear at that moment. I knew I wanted to make her a quilt as a goodbye gift—what better way to surround a good friend with a warm hug even when she is far away!


The cheery, happy colors of the new line, Simply Color by V and Co, were perfect! I chose the green, blues and greens for Lori’s quilt. I am going to save the orange, pink, gold and purple for another project.


Precuts of a charm pack and jelly roll come together so easily for this quilt. This finished throw size quilt measures 50 inches by 60 inches.


Choose 20 charms you want to use and pair up with 20 of the jelly roll strips, making sure you have good contrast between the charm and the jelly roll strip.

Cut off selvages for each strip. Stack two strips to speed up cutting.


Cut each folded jelly roll strip into a 5 inch strip and a 9 inch strip. Each strip gives you two 5 inch and two 9 inch pieces. Set aside the remainder 15 inch piece to use for a piano key pieced wide border.


Sew the 5 inch strips to the bottom and top of the charm. Press. Sew the 9 inch pieces to the sides. Press.


Trim each block to 9 inches. Arrange blocks in rows of 4 blocks x 5 blocks.


I don’t have pictures of the sashing steps but it is easy….First, cut (49) 2” x 9” sashing strips.

Sew vertical sashing strips to the sides of the blocks in each row of 4 blocks. (5 sashing strips in each row).

Cut (30) 2” x 2” cornerstones and sew to horizontal sashing strips. Start and end with the small cornerstones. (4 sashing strips in each row).

Sew the long horizontal cornerstone/sashing strips to the vertically sashed rows, matching seams carefully. Sew rows together.

Sew narrow border strips (1 ½ inch wide) to bottom, top and sides.


Arrange the extra 15”strip pieces together in a pleasing color combo, and sew strips together in sections. I used some extra jelly roll strips and added in some strips of the same white that I used for the sashing to get the length I needed. You will need 21 piano keys on the bottom and top borders and 26 piano key pieces on the sides. You may need to play around with this to get the color arrangement and length you want.


Sub cut the sewn strips into 5 inch wide sections. You can cut the piano key border in more narrow sections if needed.

Use 5 x 5 inch squares as cornerstones for the border. If you cut the piano key border less than 5 inches, adjust the size of the squares. IE… if you are using a 4 ½ inch wide border, cut your border cornerstone squares 4 ½ x 4 ½ inches instead of 5 inches.


Sandwich, baste, quilt and bind. I quilted using straight lines both vertically and horizontally. (The binding fabric is from Amy Butler’s Lark and the backing is a JoAnn’s fabric). To view more of Grandma Jane's tutorials, including sandwiching, basting, quilting and binding, click HERE.


 Wash and dry so your quilt is all warm and snuggly and ready to be mailed off! 

How would you like to have some of the “Simply Color” fabric to make a special friend a simply wonderful quilt to show them how much you love and adore them?


Enter to win TWO CHARM PACKS AND A JELLY ROLL of "Simply Color" with a comment (or two, three or four).

To enter the giveaway, do one or all of the following (please leave a separate comment for each entry):

1. Tell us about that special friend or person in your life who helps you get through your day with lots of smiles and laughter.
2. Become an official follower of The Cottage Home Blog (Google Friend Connect, Email or RSS Feed).
3. Become a fan of The Cottage Mama on Facebook (click here).
4. Share this giveaway with your friends on Facebook or on your own blog.

Giveaway open to US Residents only.
Giveaway open until Thursday, September 20, 2012 at Midnight (CST).

So there you have it! There are four chances to enter to win and make your very own Jelly Roll Friendship Quilt.

What a blessing those friends are in our lives. Thank you, Lori, for all the laughter and even the tears we shared! Miss you lots!

Thanks for guest blogging, Mom ~ you are simply the best!