Showing posts with label Farmhouse Table. Show all posts

Thursday, September 6, 2012

Morning Blackberries


I love blackberries, but the ones I savor most are those that we pick right outside our door. There's something about wandering out through the patio in your pajamas with an empty bowl in hand, and coming in with fresh, morning chilled fruit to begin the day, that makes them extra sweet. 


We've had a bumper crop this year.  We've been picking for over a week now, and as you can see, there are plenty of pink berries continuing to ripen. 

Best wishes on enjoying yet one more of the seasons of bounty in late summer.

Tuesday, August 28, 2012

Late Summer Pears


After such a long hot summer, I am so very excited to see signs of autumn on the horizon. Beautiful ripe pears are just the beginning of our transition into another gorgeous season. 

Here are a few scenes from the pear orchards early this morning...


Happy pear season to you! 

Monday, August 6, 2012

Refrigerator Pickles - with bite


Cucumbers always sneak up on us, seemingly magically appearing overnight. While out in the garden the other night, Mike picked a huge crop of them.  Later that evening (when everyone was fast asleep, including myself),  he made these delicious refrigerator pickles. They are good. 

Refrigerator pickles are great because there is no canning involved, which makes them fast and easy. You basically make the brine, plop in your fresh picked cukes (or bought fresh from the farmer's market) and a few seasonings, and keep the large jar in your refrigerator.

After about forty-eight hours, they are ready to eat. They are so crisp and so fresh you'll have a hard time eating pickles from a jar again (even your own canned ones!). 

After a few rounds of pickles, if they don't have that same great pickle 'bite', you can just make another batch of fresh brine. 

Mike's recipe (as best as he can remember): 

3 cups apple cider vinegar 

9 cups water 
1/2 cup pickling salt 

2 tablespoons of sugar 
2 tablespoons of pickling spice 
12 fresh garlic cloves, peeled 
lots of fresh dill 
2 -3 lbs cucumbers, sliced (enough to fill the jar)

Onions are good in the jar too, but he didn't have any on hand this time around. 

Directions: 
Combine cider vinegar, water, pickling salt and sugar in a large pan. Bring to a boil while stirring occasionally. Cool to room temperature. 
Put dill, garlic and pickling spices in large jar.
Add sliced cucumbers. 
Pour in cooled brine. 

Wait 48 hours. 

For a sweet refrigerator pickle with less bite, you can use this recipe. 

For a good recipe to use for canned pickles, go here


Wednesday, July 18, 2012

Blackberries and Blueberries

Our blackberry bush is bursting with berries this year. 


So far (knock on wood), the deer have restrained from nibbling. 


Last year we had a nice crop that gave us a good week or so worth of pickings. This year will be even better and I'm so excited as there's nothing quite sweeter than fresh picked berries. 

The blueberry bushes are full of green berries as well. When we were out in the yard the other evening, I showed them to the babies as blueberries are one of their favorite foods. Margaret gave a few a little squeeze and determined that we'll have to wait a few more weeks before pickin'. 

Last season they weren't quite ready to eat blueberries, so it will be a special treat when we pick them this year. 

Tuesday, June 5, 2012

Culinary Herbs


While Hubby was out planting our pumpkin plants this weekend, he happened to trim a bunch of oregano. His quick trip into the house resulted in me exclaiming, "how pretty, let me get my camera!" 

The oregano that we planted last year has been especially vigorous recently with the mix of warmth and rain. 


We decided that the best way to be sure to use all this oregano was to dry it, which required separating the one large bouquet into several small ones. 


With twine tied tightly around the stems, the little bouquets are dried hanging upside down in paper bags. The bags keep the oregano free from dust and debris. 

It just a few days, the leaves will be nice and dry and can be removed from stems. Stored in a nice tight jar for extra freshness, there's nothing like using your own herbs in the kitchen. 

Wouldn't dried herbs make the loveliest holiday gifts? 

I'll have my assistant get on that...

There is no assistant, but I'm making a list of things for him/her to do anyway! ; ) 

Friday, February 10, 2012

Chocolate


In the spirit of Valentine's Day (but mostly due to my enduring fondness for baked goods), I made chocolate muffins. These are gluten free and although we are not a gluten free household, we do enjoy varying our diet as often as possible. 

The recipe comes from the book,"Gluten Free Baking Classics" by Annalise Roberts, which I've posted about before. 

Chocolate Ricotta Muffins 

1 1/4 cups Brown Rice Flour Mix 
1/4 cup unsweetened cocoa powder
1/2 cup granulated sugar
1 1/2 teaspoons baking powder
1/2 teaspoon baking soda
1/4 teaspoon xanthan gum
1/4 teaspoon salt
2/3 cup semisweet chocolate chips
1 large egg
1/2 cup ricotta cheese 
2/3 cup milk
2 tablespoons canola oil 
2 teaspoons pure vanilla extract 

Preheat oven to 350 degrees Farhenheit. 
Whisk flour through salt in large mixing bowl. 
Whisk egg through vanilla in smaller mixing bowl. 
Pour egg mixture into flour mixture and combine until well blended. Don't over beat. 
Spoon batter into greased muffin pan and place in center of oven. 
Bake 18 - 20 minutes. 
Or until inserted toothpick comes out clean. 
Cool on wire rack. 

The only unique ingredients for this recipe are the brown rice flour mix (which you can find in the gluten free section of your grocery store) and the xanthan gum. All the rest of the ingredients are pretty standard. 

Happy Valentine's Day
xo

Monday, February 6, 2012

A Taste of Summer


A bouquet of fresh basil has an especially summery fragrance during the winter months.
We bought this bouquet, which was grown in a hothouse on an organic farm here in the Pacific Northwest, to enjoy as a mid-winter treat. 


And a jar of garden tomatoes (our last jar canned from this past summer's crop!) possesses an especially sweet summer taste as the cold outdoors whisper nothing but quiet in the still sleep of winter dormancy. 

One of our favorite meals to make with fresh basil and summer tomatoes is Pizza Margherita. 

For the sauce, we simmer tomatoes down to preferred thickness. 
As the tomatoes are simmering, we add salt and pepper and Italian seasonings. 


Pizza dough recipe (makes two crusts): 

1 package yeast
1 tablespoon honey
1 1/2 teaspoons salt
1 cup wrist temperature water
2 1/2 cups or so of flour (we use a combination of all-purpose and spelt)
olive oil to drizzle on top

Combine yeast, honey, and water in a large bowl. Once the yeast has activated, add salt. Then add flour in 1/2 cup increments and knead until dough is very slightly moist on the surface. Place dough in large bowl, drizzle with oil, and place in warm spot to rise for an hour or more.

Roll out the crust onto floured pizza pan and bake at 425 until just slightly golden. 


Remove from oven and drizzle olive oil over crust and top with fresh tomato sauce. 


Add fresh basil. 


Top with shredded Italian cheeses. 

Bake at 425 until done. 

After reading recent articles such as this one in the Huffington Post, we've held off on buying food packaged in cans. I stopped buying tomato products packaged in cans several months ago but just recently learned that all canned goods may be in danger of absorbing the BPA lining. 
See New York Times article here

I thought I'd pass the information along to anyone who may be interested. 

Sunday, January 29, 2012

Cooking with Cast Iron


We have been cooking with a cast iron for over a year now. Our reasons for switching from standard non-stick cookware were based primarily on health considerations and the confusing information we had read on the chemicals used in the non-stick coating.

Before switching to cast iron, we had been using a 'green' non-stick version that had eliminated the controversial PTFE (Polytetrafluoroethylene)  and PFOA (Perfluorooctanoic acid) coatings. But we didn't think it held up very well and just started worrying all over again about the various other chemicals used to create this new form of non-stick.

So we made it very simple for ourselves and went back to the 'original non stick' - cast iron.

Cast iron possesses no potential dangerous coatings, will not chip or scratch and is also a great way to introduce trace amounts of iron into your diet.And if that wasn't enough incentive, cast iron is also very affordable. A twelve inch skillet for example is less than $30 (here) and it will last forever.

Cast iron is also great to cook with as it distributes heat evenly. We primarily use a pair of large and small skillets for everyday cooking. We also use a cast iron dutch oven in place of a crock pot for stews, slow roasts and soups. Our remaining cookware consists of copper-bottomed stainless steel sauce pans.

We purchased our Lodge cast iron skillets pre-seasoned.  Every several months, we re-season them by coating with oil and baking in the oven at 350 for 45 minutes. After 45 minutes, we turn the oven off and let them cool on the oven racks.

For daily maintenance, we soak the pans in warm water after each use. We then scrub with a scouring sponge, rinse with hot water, and pat dry. Occasionally, we also rub a light coating of oil into the skillets while they are still warm from rinsing. We follow the same care with our Dutch Oven.  With cast iron it is recommended to not use soap and to not soak in water for long periods of time as this promotes rust and deteriorates the seasoned condition of the cookware (which makes the cast iron non-stick). In the worst-case scenario, you just have to re-season the cookware as described above.

Like all choices we make in life,  we strive to find ways in which we can live by the healthiest means possible. Some choices are easy to make, some take effort. But we are passionate about creating the healthiest life for ourselves and our babies, so the transition to cast iron does not feel like extra work. In fact, it offers quite the opposite for nothing outweighs peace of mind.

Tuesday, January 10, 2012

Old and New


Our home is filled with a mixed collection of old and new. Perhaps one 
of the most frequent reminders of this is found in our kitchen drawers.  


Our everyday cutlery consists of two mismatched but complimentary sets found several years ago 
at Home Goods. They reside in front of my Grandmother's every day silver plate cutlery that is 
kept in the wicker basket at the back of the drawer. Next to the collection of antique bottle openers 
I've collected are hardware store clothespins used to fasten bags. 

The wood cutlery box was my Grandmothers. 


This old wicker paper basket holds our knives and some of our serving utensils. 

The other kitchen drawer holds mostly new utensils with a few old things mixed in. 

This twenty-piece set of cutlery is from Martha Stewart's old line 
at K-Mart, which I found on sale for $9.99. The wire basket that holds this set 
was found at an antique store. 

My Grandmother's old ice cream scoops co-habitate with the modern metal can opener, scissors 
and peeler. I love the mix between the cool metals and the warmth of the wood and wicker. 

It's amazing to think of the different time periods in which these items were made and originally 
used, yet how compatible they are today. 

Here are the latest additions to our drawers. My mom sent my old baby spoons to us when 
Graham and Margaret started eating solid foods. Each has its own subtle design. These are the 
only baby spoons we use so they're used several times a day. 

xo

Friday, December 23, 2011

Holiday Jam


This is the first season that we made jam from our concord grapes. I have to say that it was exciting to think of eating jam from fruit that grew on our land. I am also quite a connoisseur of jam (meaning I eat an awful lot of it!). Oh, how I looked forward to opening the refrigerator and grabbing a jar of our homemade jam, grown right outside the kitchen door. 


Well, we'll just say that we'll have to work out a few kinks and consider this year's batch to be a test run. In the end we didn't end up with so many jars. So we've reserved them for a small handful of family members (people who will think it tastes good based on the pure effort alone). 


Here are a few of the jars (there were a total of eight in all). 


Here are the grapes ready for cooking.


Taking the grapes off the stems was by far the most arduous part of the process. And when I say 'arduous' I mean that it looked like Mike was doing it for quite some time... I'm admitting here nearly at the end of this post that I hardly helped make the jam. 

Mike was the master canner and he did a wonderful job. Making jam takes patience and the 
wisdom to stick to the recipe. He possesses these qualities in abundance! 

Well, our stockings are hung, the tree is trimmed and I've officially consumed at least an entire loaf of pumpkin bread over the last several weeks. 

'Tis the season...

Sunday, December 18, 2011

Christmas Kitchen

I love bringing out my Grandmother's old red transfer ware this time of year. These were her 
everyday dishes so many family meals were shared using them. When I left Los Angeles and moved to Maine to go to college, I was able to enjoy those meals much less frequently.

But when my Grandmother was alive, I never once missed a Christmas Eve dinner at her house. My father was my Grandmother's only child, so my brother and I were her only grandchildren. 

We felt very, very loved. 

Her name was Margaret. xo


Yes, more pomegranates. 


Pomegranates never stay in the fruit bowl for very long. 


These evergreen cuttings look like holly but are actually a Northwest native plant called Oregon grape. Lili used a few clippings for the photo shoot (it's visible in the magazine), and I thought it was such a wonderful idea that I've been using it all over the house lately. 


Due to my complete and utter weakness for pomegranates, we have been consuming them 
non-stop. I love them on pancakes or french toast on the weekends, but 
also crave them on my weekday morning oatmeal as well. 

This sort of consumption, as you can imagine, is logistically challenging. I am rarely 
without a baby in my arms (they too are too delicious to not want to hold them all the time), so seeding 
messy pomegranates takes some orchestration. 

But wonderful news - I've found a miracle process by which to extricate the juicy seeds - saving 
a lot of time and mess! And just who on earth could know such a secret? 
Yes, that's right, it's Martha Stewart. 

Watch her tutorial here

It does work but I would recommend doing it in the sink as 
this process, although very time-saving, is not splatter proof. 


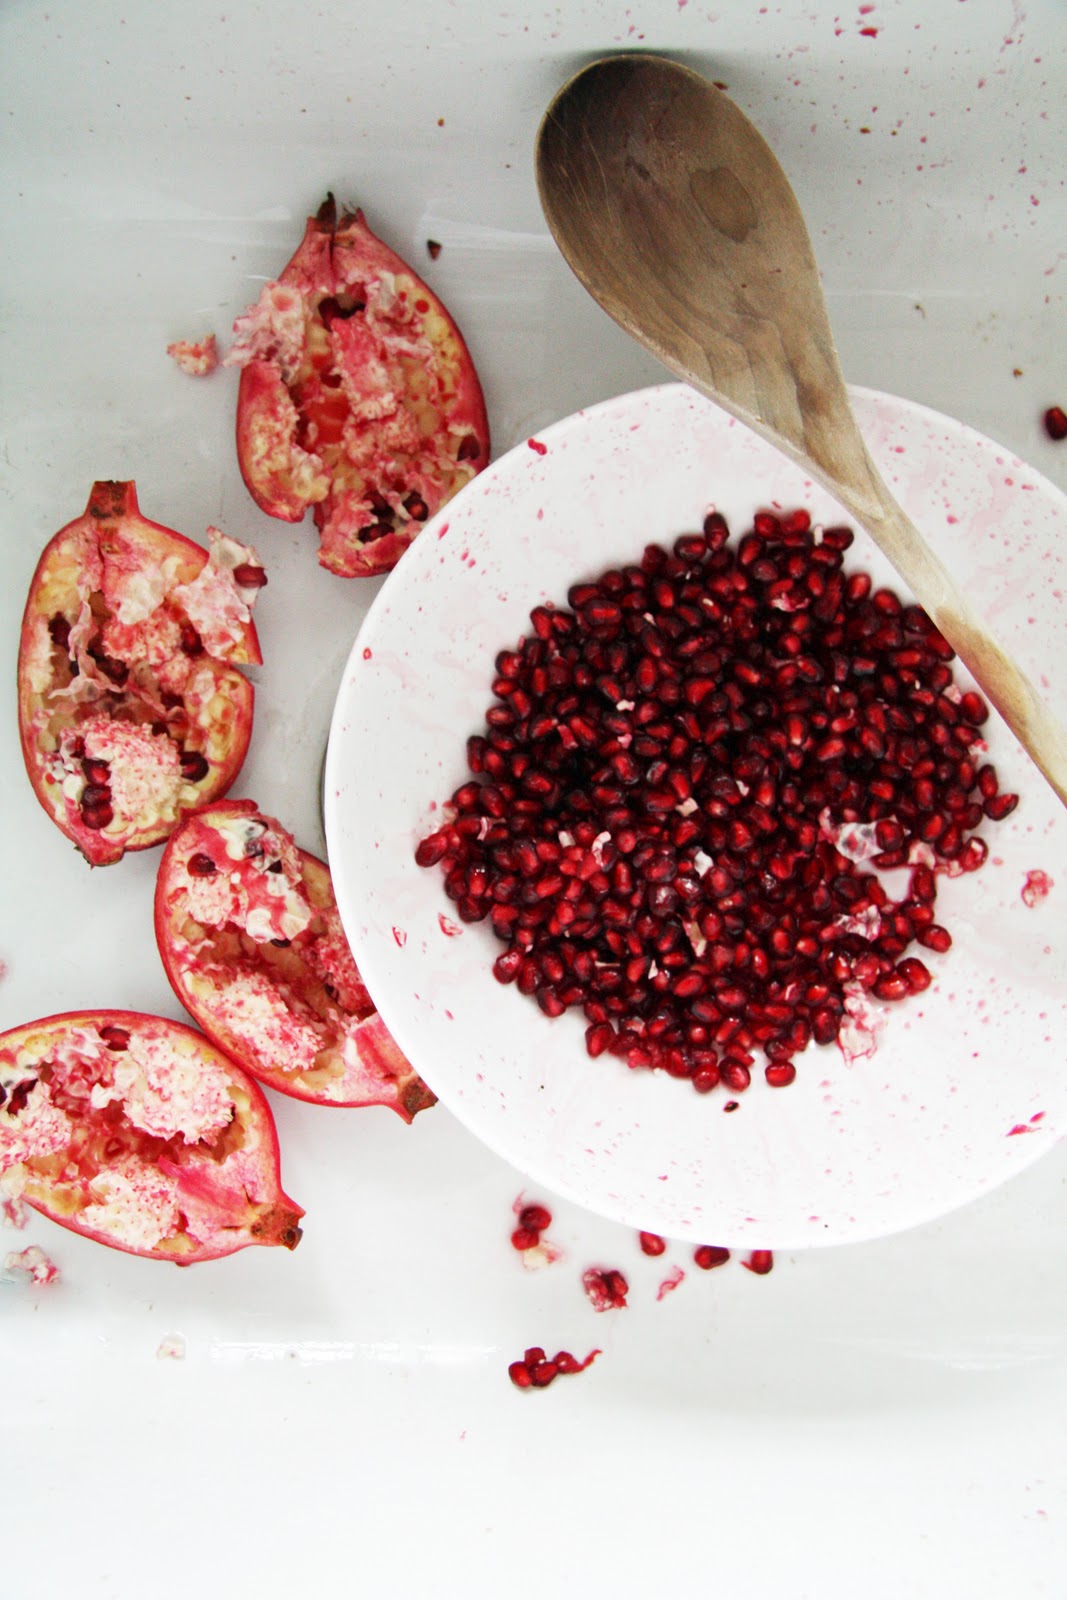
Here is one of my quarters after using a wooden spoon. 


Here is what the work area (inside my sink) looked like afterwards.  All of the 
splatters stayed in the sink basin due to hitting the pomegranate face down. 

For once, I had not one tiny splatter on my clothes! 

xo

Wednesday, November 30, 2011

Beautiful Pomegranate

'Tis the season for the beautiful pomegranate.

I remember eating pomegranates as a child. My mom would break one open, pull out the bread board under the counter (remember those) and my brother and I would stand there and gobble up all of the juicy seeds. 

Perhaps because they're a fruit from my childhood, they are a favorite fruit of the season. 

I like to seed the fruit all at once so that there's a lovely bowl from which to scoop up big bites. The seeds are a wonderful topping on just about everything from savory cheese and crackers to...

...delicious sweet pancakes. 

We eat a lot of pancakes in our household, but I have an extra spring in my step when we have pomegranates to enjoy with them. It's such a special treat.  

I've posted about Hubby's spelt pancakes before and just have to reiterate how delicious and fluffy they are (the trick is whipping the egg whites). 

Hubby's Spelt Pancakes

2/3 cup stone ground corn flour
1 cup spelt flour
2 tsp baking powder
2 tsp raw sugar
1 tsp salt 
2 eggs - separated
1 1/2 cup milk 
2 TB melted butter

Combine dry ingredients in large bowl. Whisk wet ingredients in a small bowl. Whisk egg whites separately in another small bowl until frothy. Combine together with dry ingredients in large bowl.