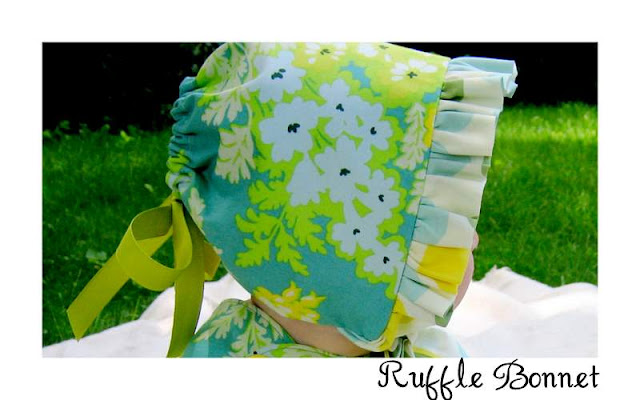
Yesterday I just had to show off the little birthday outfit that I made for my sweet Matilda Jane. I just loved the way it came together. But what I think really completes the look is the ruffle bonnet.
This project is actually more simple than it looks. And the great thing about this bonnet is that it is one-size and adjustable. Cinch the ribbon in the back really tight for a 6 month old and let it out as they grow. The bonnet Matilda is wearing fit my daughter Savannah (2 years) as well once I let out the back a little and still has room to grow.
This tutorial is designed for a one size bonnet, size 6 months - 3 years. It involves some very basic sewing techniques, so if you are new to sewing, give this a try. Let's get started......
Ruffle Bonnet Tutorial
Supplies:
Fabric - two coordinating prints
Thread
Single-fold bias tape
Fusible interfacing
Ribbon (I used grosgrain)
Iron
Directions:
Cut fabric pieces:
Main Bonnet-
2 rectangles (one for exterior, one for interior lining) - 17.5" x 7"
2 rectangles interfacing - 17.5" x 7" (just very inexpensive light-weight interfacing)
Ruffle-
1 long strip 43" x 3" (this will be folded in half)
Ties/Straps-
2 strips 19" x 2" (this will be folded in half)
Ribbon-
1 long piece - cut to your desired length, approximately 21"
Apply your interfacing to the two main bonnet pieces according to package directions. This is the most inexpensive interfacing around. I think it was .77 for all of this.
*This is NOT anything like wonder-under (which you know I love). This is just one-sided interfacing - wonder-under will fuse two pieces of fabric together, this will not and we don't want it to. We are using this just to add more body to the bonnet.
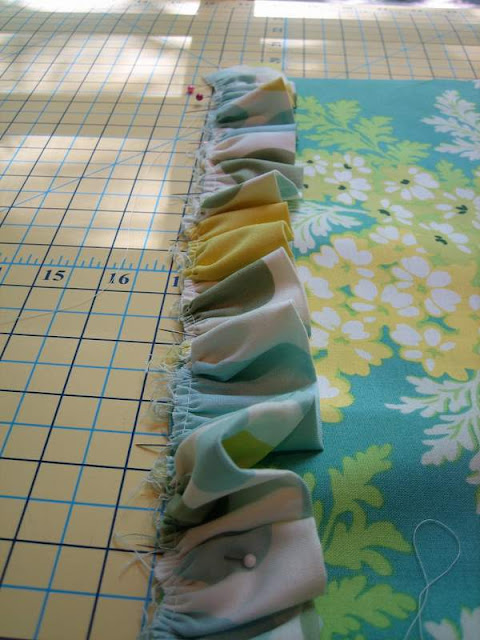
Fold your ruffle piece in half, length-wise and press - wrong sides together. Run a gathering stitch along the top of this piece. To do this, set your machine to the longest stitch length. Stitch along the top of the fabric making sure NOT to back-stitch at the beginning or end.
Here's your ruffle after you have run your gathering stitch. As you can see, we still need gather it.
To do this, pull one of the threads on either end. Continue to work the gather until you have reached 17.5" long.
Pin the ruffle to the long-side of one of the main fabric pieces. The ruffle should be pinned to the right-side of the fabric facing inward.
Stitch the ruffle in place - 1/4" seam allowance.
Now place the other main bonnet piece on top of the piece with the ruffle - right-sides together.
Stitch the two main fabric pieces together - 1/2" seam allowance.
Now to make the ties that go around the neck. Fold each of the two fabric pieces in half - right-sides together. Stitch down the long-side and then close one of the short sides. I cut the ends at a diagonal for fun. Then turn the tubes right-side out and press.
Open up the main bonnet pieces to reveal the ruffle inside. Place one of the straps, pointing inward at the seam on top of the ruffle. The raw side should be lined up with the raw side of the ruffle and main bonnet.
Close the main bonnet piece again and pin. Do the same thing on the other short side with the other strap.
Stitch both short sides closed - 1/2" seam allowance.
Clip both of your corners. You need to do this so it will look nice when you turn it.
Turn right-side out and press.
Now three of your four sides should be closed. The ruffle is complete as well as the tie straps.
At this point you need to decide what is the interior of your bonnet and what is the exterior. Once you have decide that, you need to pin your single-fold bias tape to the exterior. Cut your bias tape the same length as the long side of your bonnet. Unfold one side and line it up with the raw, unfinished long-side of your bonnet and pin. Stitch in place.
Now fold your bias tape over to the interior side, making sure that you leave a wide enough opening for whatever ribbon you have chosen to use. Press, pin into place and stitch as close to the edge of the bias tape as possible. This will make a tunnel for you to thread your ribbon through.
Now for the ribbon. Like I said before, you can cut this ribbon to your desired length. Maybe you want a big, huge long bow or maybe you want something more subtle. I would thread the ribbon and then cut it to see how you like the look.
Now it's time to thread the ribbon. Do you have one of these? It's called a bodkin and I seriously don't know what I would do without this thing. It makes threading ribbon, elastic, ect.......SO easy. If you don't have one, head to your sewing shop and buy one - you can find it in the notions section and they are very inexpensive. If you don't have one, just attach a safety pin to one end of the ribbon and thread that way.
Thread the ribbon through the opening you just made with your bias tape.
Cinch the ribbon as much or as little as you like, depending on the child's head size. Tie in a bow.
And there you have it - your completed Ruffle Bonnet! Isn't it just so sweet?
I really think that the bonnet makes this little outfit. Make one of these bonnets to coordinate with any of your little ones favorite dresses or outfits. This would also make a wonderful gift for a new baby.
My sweet baby girl sure loves her new hat. Her sister loves it too - I think I may be making another one of these so we don't have any fights over this cutie little hat!
Cottage Mama's Note: This project is great for a beginning sewer to practice some basic techniques. If there is anything you have a question about, please feel free to email me or leave me a comment and I am always happy to help.


No comments:
Post a Comment