I'm sure many people have different techniques in adding piping to clothing, but here's how The Cottage Mama does it......so, here we go.......
Sew Basics: Piping
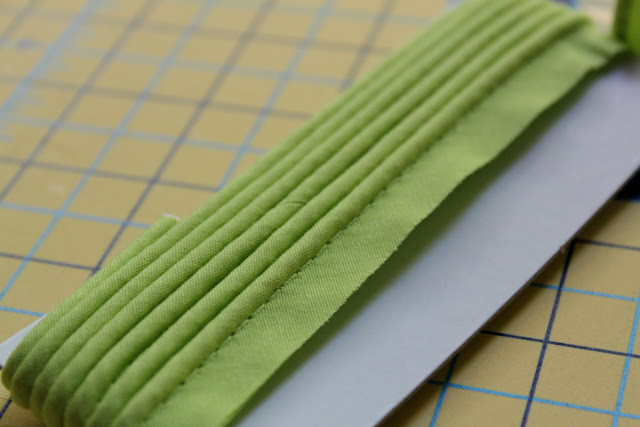
Piping is a narrow piece of fabric that encases a piece of cording. You can make your own piping or buy pre-made piping in the notions section of your local fabric store. Today we will discuss store-bought piping. I will cover creating your own custom piping in another "Sew Basics" session.
Piping is a wonderful way to add detail and professionalism to any garment. I love using piping in my children's clothing that I sell in my etsy shop. I think it takes clothing to a whole new level and makes each piece truly special.
Piping can be inserted into any seam. Whether you want to add a little piping detail in a collar, waistband, arm hole, ect........the options are endless. You can also use piping in decorative household projects as well.
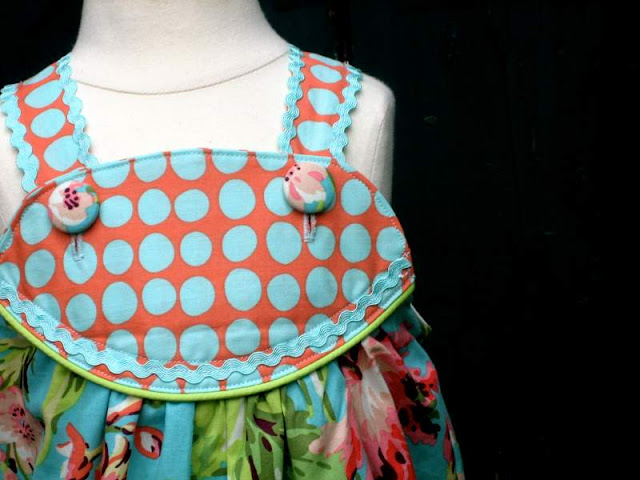
So, here is a little bubble romper from my etsy shop where I used piping in the seam between the bodice and the main body of the romper:
For this garment, I decided some bright-green piping would be a lovely detail separating the bodice from the main body of the romper.
So to insert piping into a garment like this, you will need store-bought piping and straight pins.
But if you want to make your life REALLY easy, then you should get yourself some Wonder Tape. This stuff is awesome!! In order to sew piping, you do not need Wonder Tape, it's just nice to have.
You can find Wonder Tape in your notions section of your local fabric store. My Joann's always seems to be out of this, so if you find some, snatch it up. It's not cheap, but it will last you a LONG time.
Wonder Tape can be easily sewn through and will not gum up your needle (most other tapes will mess up your needle). It disappears after washing too. So, if you are trying to hold something in place and would rather not use pins, Wonder Tape is a great option - try it with other trims as well!
First you will need to apply your Wonder Tape to the piping. If you are not using Wonder Tape (which you definitely don't NEED to), then skip this step. You want to apply the tape to the side of the piping that will be up against your fabric.
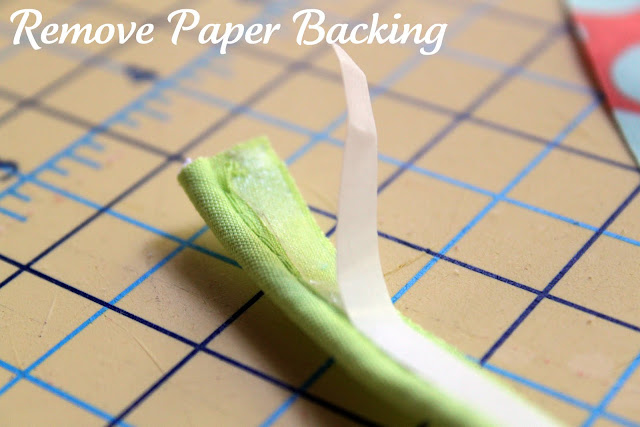
After you have applied one side of the tape to the piping, remove the paper backing. Surprisingly, the paper comes off really easily.
Now it is time to apply the piping. Place the piping with the raw edges of the piping to the raw edge of your other piece of fabric. Generally your corded piping piece should be towards the inside and the raw edges to the outer. If you are not using Wonder Tape, pin your piping in place.
At this point, if you are using a pattern, please make note of the seam allowance. You want your piping to be in your seam, so if you have a 5/8th seam allowance, you may need to move your piping in a little ways away from the edge of the fabric. Please adjust where you place your raw edge of your piping accordingly. Because I was not using a pattern, I just lined up the raw edge of my piping to the raw edge of my fabric. Depending on where you decide to add piping, the seam allowance may or may not really matter.
This is what your piping will look like when it is ready to be stitched. If you aren't using Wonder Tape, then you will have straight pins holding the piping in place during this step.
In the next step, I talk about the original piping stitching and I just wanted to give you a visual so you know what I am talking about. The original stitching is the line of stitches that holds the cord in place and is already there on your store-bought piping.
Now you will want to stitch slightly to the left of your original piping stitching. You need to make sure you stitch to the left, because if you don't the original stitching will show through when you turn your garment.
Also, I like to use my regular sewing foot for piping, but some people like using a zipper foot. With a zipper foot you can get closer to the piping. For me, I feel like I have more control with my regular foot. Give both a try and see which way works best for you.
This is what your stitching looks like after. It's hard to see, but my stitching is the white one ever so slightly to the left of the green.
For this garment, there was the main body of the romper and then the lining of the bodice to pin in place. So, basically all of the raw edges meet up and I pined them all together. If you were just adding piping to a collar or arm holes, you would not need to worry about the gathering the main body (like in this romper). You would just pin (right-sides together) the collar with the piping to the other piece of the collar.
Make sure you pin with your stitching-side up because you will need to see this in the next step.
Now stitch again, ever so slightly to the left of where you stitched earlier. In this step you are squeezing the piping and this is what is going to make it look nice and clean from the other side.
If you don't sew enough to the left of your other stitching, that's ok, just go back and stitch again until it looks right when you turn things right side out.
This is what your piping will look like when your turn your fabric right side out. Make sure you press your garment to make your lines look clean. Again, like I said if you didn't squeeze the piping enough, just turn the garment in side out and stitch again until it looks like this.
You can top-stitch once you have turned your garment or just leave it as I did. Top-stitching just means to add a decorative line of straight stitching with a 1/8th seam allowance. I like using top-stitching for added durability in children's clothing.
Here is the completed bubble romper with piping detail in the bodice. I love the way the green piping pops against the orange and blue.
Here are a few other dresses with piping in the collars:
Give piping a try. It's not very hard once you try it a couple times. You may not get it the first time, but try, try again. Once you get used to it, you will be looking for ways to add it into all of your sewing projects.
Cottage Mama's Note: If any of these steps are confusing or are unclear, feel free to leave me a comment or email me and I will try to clarify anything that might not make sense.


No comments:
Post a Comment